|
Kamaldeep Singh Oodles

Kamaldeep Singh (Manager-Technical Project Manager)

Experience:10+ yrs

Kamaldeep is a highly skilled Backend Developer specializing in Java, specifically the Spring framework. He also has extensive knowledge of Javascript and associated frameworks such as Node.js and Express. He possesses a deep understanding of the latest technologies and has hands-on experience with Core Java, Spring Boot, Hibernate, Apache Kafka messaging queue, Redis, as well as both relational databases like MySQL and PostgreSQL and non-relational databases like MongoDB. He has made significant contributions to various projects, including Viral Nation, ExamWorks, TNIBRO, Biogas engineering, SecureNow - Web Application, FB Messenger Chatbot, Dialogflow Chatbot, and Catalyst. Kamaldeep's expertise allows him to seamlessly integrate different technologies into applications, highlighting his adaptability and innovative mindset. His practical experience and strong technical skills make him an invaluable asset to any team.

Kamaldeep Singh Oodles
Kamaldeep Singh
(Technical Project Manager)

Kamaldeep is a highly skilled Backend Developer specializing in Java, specifically the Spring framework. He also has extensive knowledge of Javascript and associated frameworks such as Node.js and Express. He possesses a deep understanding of the latest technologies and has hands-on experience with Core Java, Spring Boot, Hibernate, Apache Kafka messaging queue, Redis, as well as both relational databases like MySQL and PostgreSQL and non-relational databases like MongoDB. He has made significant contributions to various projects, including Viral Nation, ExamWorks, TNIBRO, Biogas engineering, SecureNow - Web Application, FB Messenger Chatbot, Dialogflow Chatbot, and Catalyst. Kamaldeep's expertise allows him to seamlessly integrate different technologies into applications, highlighting his adaptability and innovative mindset. His practical experience and strong technical skills make him an invaluable asset to any team.

LanguageLanguages

DotHindi

Bilingual

DotPunjabi

Fluent

DotEnglish

Bilingual

Skills
Skills

DotTechnical Project Management

80%

DotJava

80%

DotHTML, CSS

60%

DotFullstack

80%

DotJavascript

80%

DotCustomer Success

80%

DotProject Management

80%

DotDjango

60%

DotMySQL

60%

DotSpring Boot

80%
ExpWork Experience / Trainings / Internship

Jan 2015-Present

Technical Project Manager

Gurgaon


Oodles Technologies

Gurgaon

Jan 2015-Present

Jul 2014-Dec 2014

Software Developer

Changidarh


Edlive Technologies

Changidarh

Jul 2014-Dec 2014

EducationEducation

2011-2014

Dot

DIT University

MCA - Master of Computer Application-IT

2008-2011

Dot

Amrapali Group of Institutes

BCA - Bachelor of Computer Applications-IT

Top Blog Posts
Create Google Form Via Google OAuth 2.0 Playground

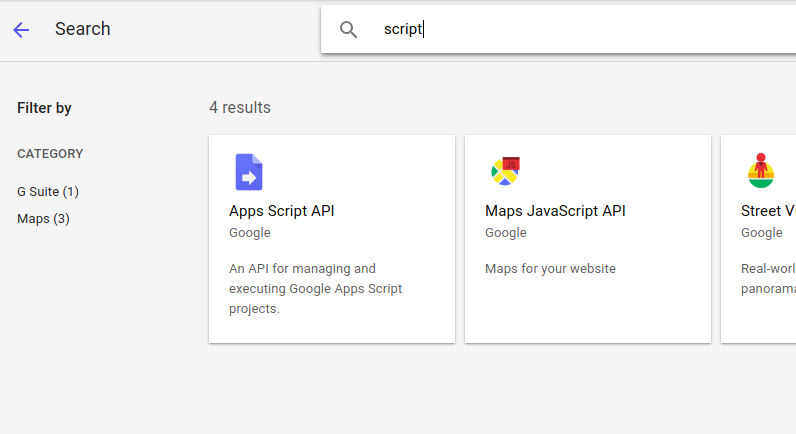
In this blog, I would like to help you with generating the google forms using the Google Appscript and running the app script code via Google OAuth 2.0 Playground. For this, first, we need to set write code to generate a form via app script. Kindly follow the following steps.

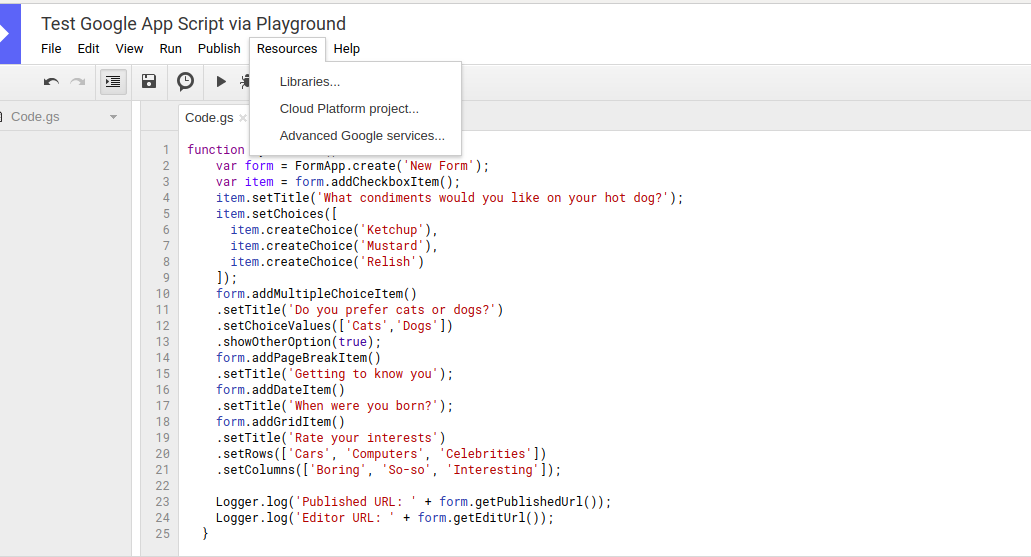
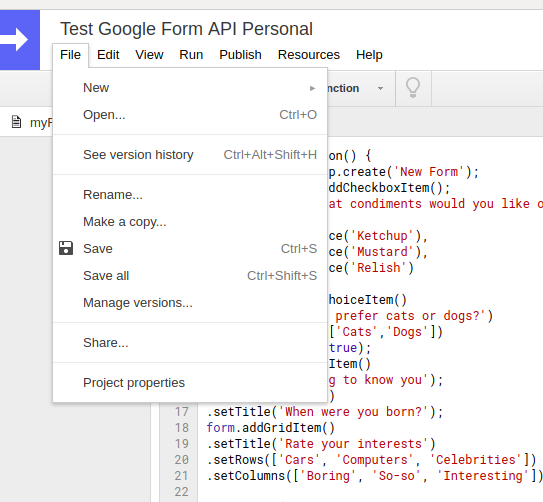
1. Create the app script project and give it a name. Write the following code to create a form at https://script.google.com

Make sure that the .gs file name and the function name is also the same.


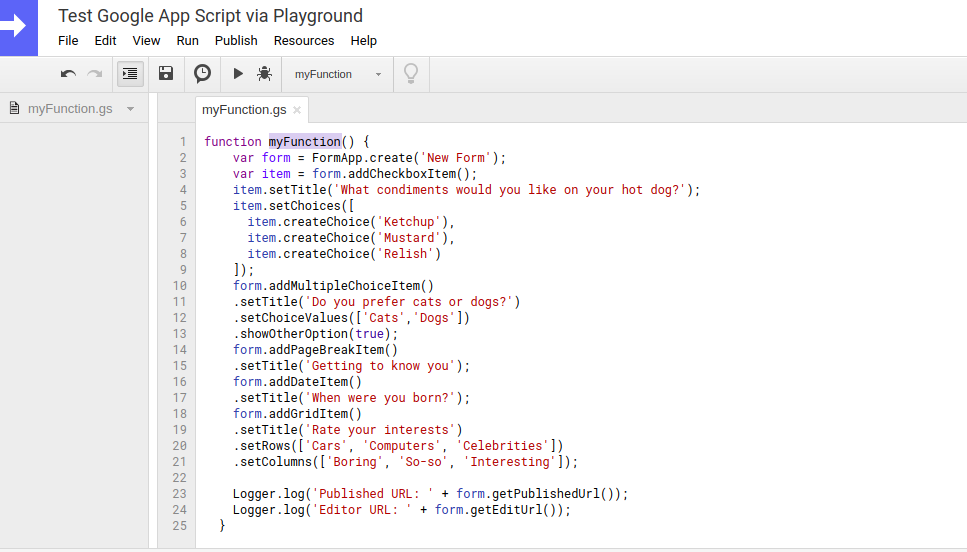
  function myFunction() {
    var form = FormApp.create('New Form');
    var item = form.addCheckboxItem();
    item.setTitle('What condiments would you like on your hot dog?');
    item.setChoices([
      item.createChoice('Ketchup'),
      item.createChoice('Mustard'),
      item.createChoice('Relish')
    ]);
    form.addMultipleChoiceItem()
    .setTitle('Do you prefer cats or dogs?')
    .setChoiceValues(['Cats','Dogs'])
    .showOtherOption(true);
    form.addPageBreakItem()
    .setTitle('Getting to know you');
    form.addDateItem()
    .setTitle('When were you born?');
    form.addGridItem()
    .setTitle('Rate your interests')
    .setRows(['Cars', 'Computers', 'Celebrities'])
    .setColumns(['Boring', 'So-so', 'Interesting']);

    Logger.log('Published URL: ' + form.getPublishedUrl());
    Logger.log('Editor URL: ' + form.getEditUrl());
  }

2. Run the Script to test if the script is running fine or not.


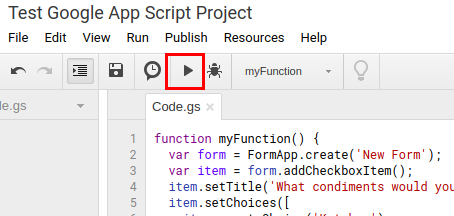
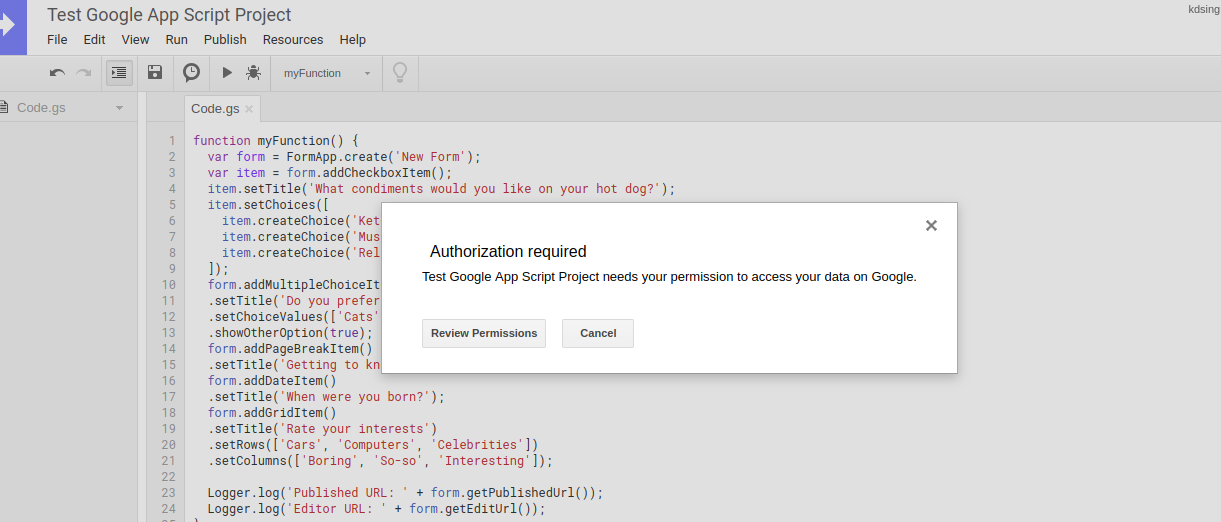
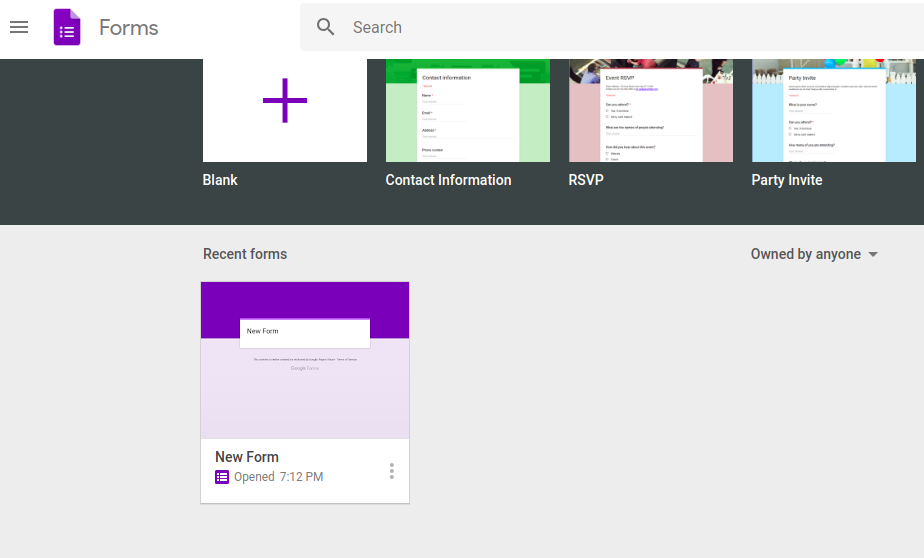
3. On Run, it may ask you to authorize the app. Authorize the application and then open the Google Forms to test if the sample form is created or not.


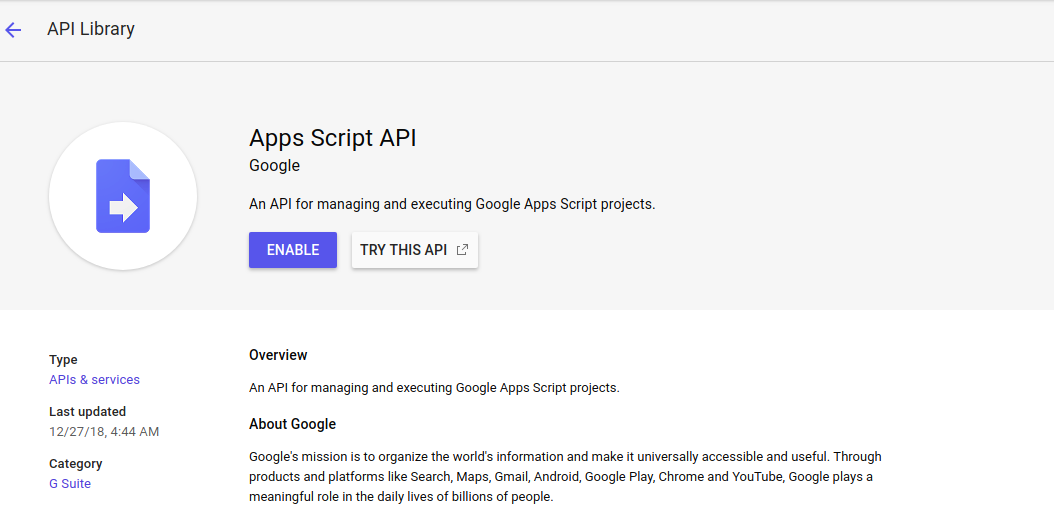
 4. Next, we need to create credentials so as to access this project via Google OAuth 2.0 Playground and run the script. For this go to Resource -> Could Platform project -> View API console, and do "Create Credentials" and retrieved client ID and client secret.


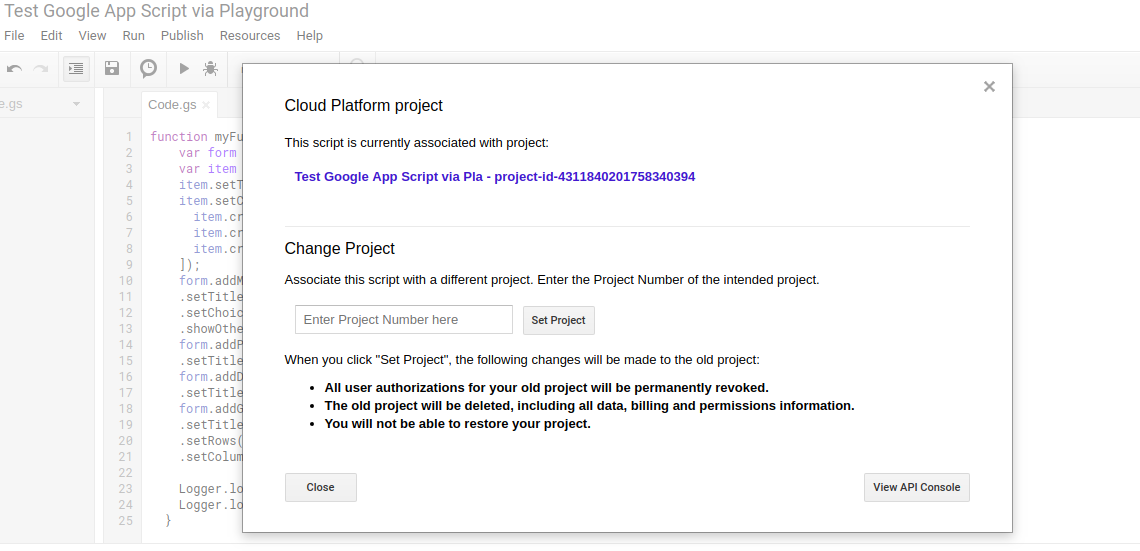
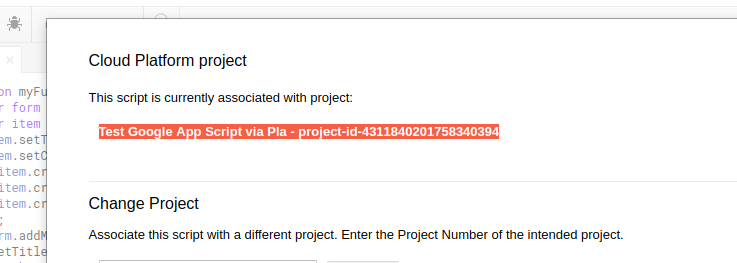
You can also access the project by clicking on the created project from the pop-up

 Or you can directly visit the console https://console.developers.google.com and select your project (Named in the app script).


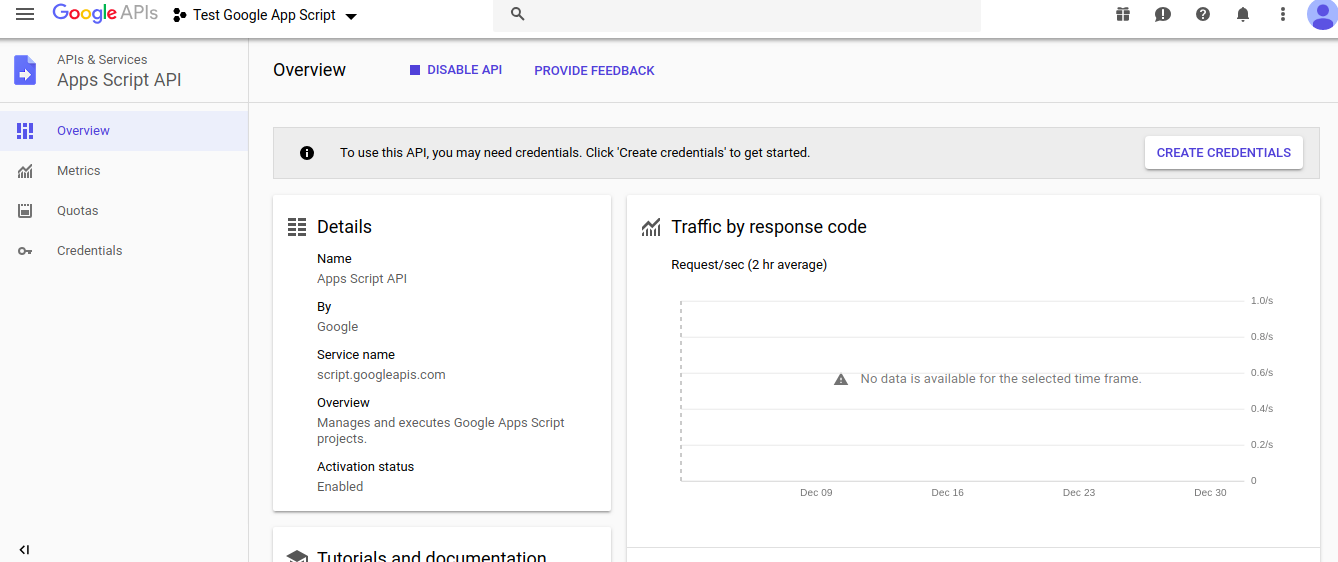
5. Next, enable the App Script API


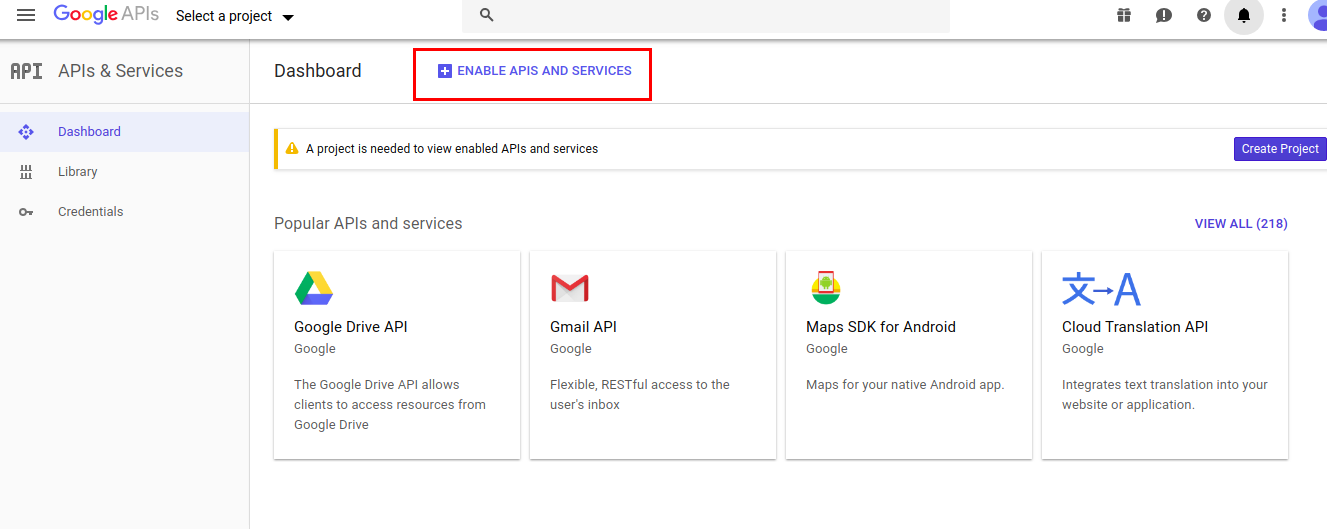
Make sure while enabling you have selected the newly created project. 


6. Next, you need to create the credentials to access the script from Google OAuth 2.0 Playground.

In the "Authorised JavaScript origins" set "http://localhost"

In the "Authorised redirect URIs" set "https://developers.google.com/oauthplayground" as currently, we will be requiring the authentication response on the Google OAuth Playground. And click on Create.


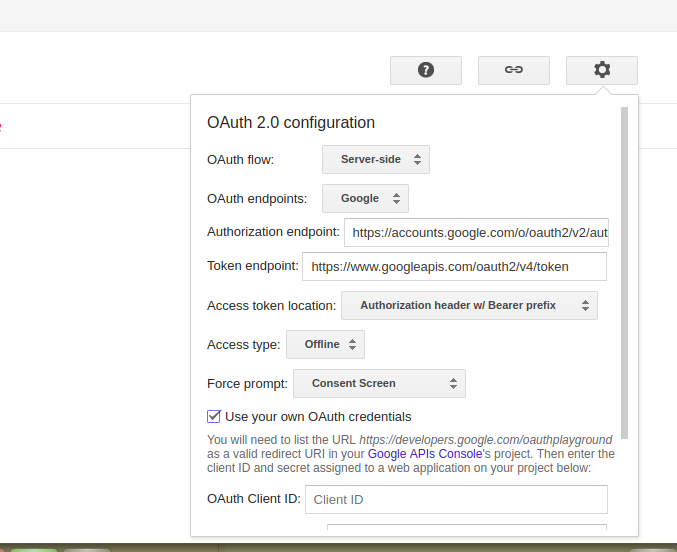
7. Now visit https://developers.google.com/oauthplayground and click on the Settings Gear. In the drop-down menu, check the "Use your own OAuth credentials" and enter the "OAuth Client ID" and "OAuth Client Secret" received on the step 6

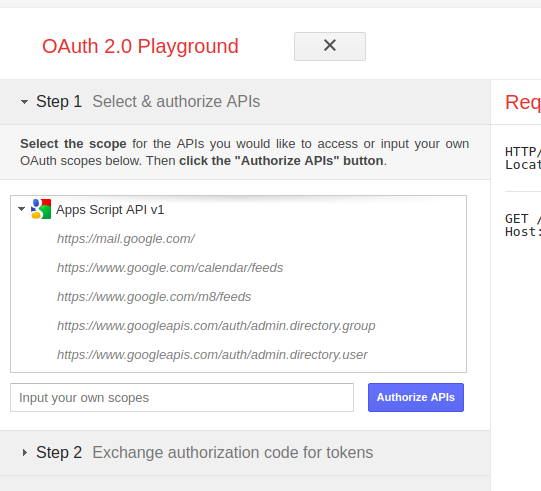
8. Next, in the "Step 1 Select & authorize APIs" section, select the "Apps Script API v1" and further select the "https://www.googleapis.com/auth/forms" option and click Authorize


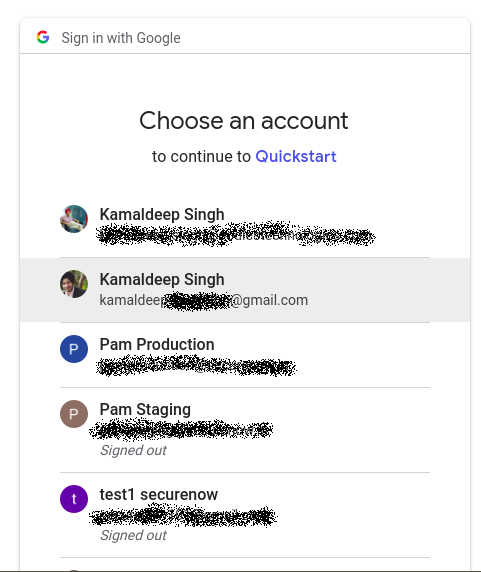
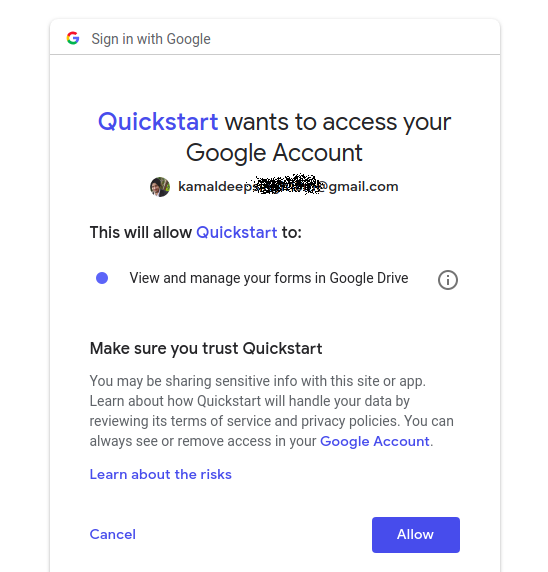
 9. Next, it will ask for the Authorization of the account of whose you wanna access the selected scope. In this, I am using the same account on which the "App Script" for for creation code is created and the same from which the "Client ID" and "Client Secret" is generated. 

10. The above step will generate the "Authorization code" and further you can generate the "Refresh token" and the "Access token". 


11. Next, we have to consume the services to execute the google app script code. Click on the "List Possible Operations" and then select "Run Scripts" 

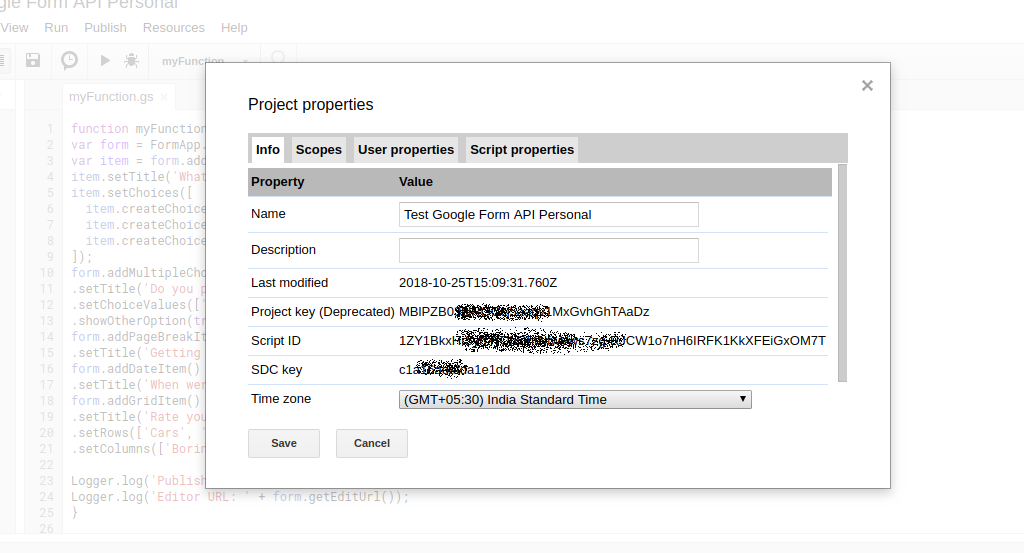
12. Next, a Syntax will be generated, asking for the script ID which you can find from the google app script project. For this, on the Google App Script project, Click on File > Project Properties and finally, a pop-up will open referring the script ID


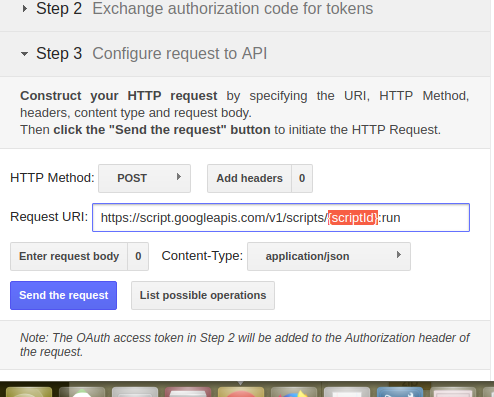
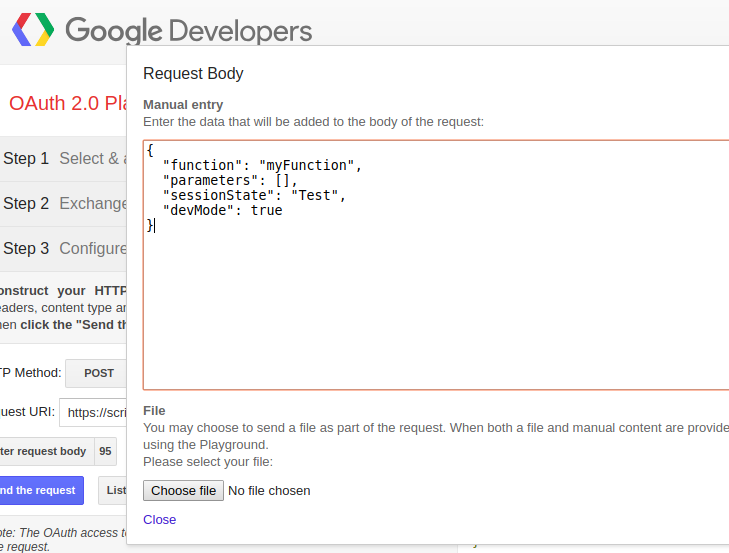
 13. Enter the script ID in the PlayGround and then set the request Body by clicking on the "Enter Request Body" button. To understand the request body parameters, refer to the document https://developers.google.com/apps-script/api/reference/rest/v1/scripts/run


14. Now click on the "Send Request". On the successful run, a form will be generated the way it generated in step 3

Hope the above information is useful.


References:

https://developers.google.com/apps-script/reference/forms/

https://stackoverflow.com/questions/53010287/how-to-run-google-app-script-function-from-google-oauth-2-0-playground-the-cal


Importing Site Certificate Into Java Runtime Certificate Store
Hi guys,
We must have faced problems to connect to a server that has an invalid self-signed SSL certificate, resulting our application throws following such errors:
 
SunCertPathBuilderException occurred when processing request: [GET] /requestURL - parameters:
unable to find valid certification path to requested target. Stacktrace follows:
Message: unable to find valid certification path to requested target
OR
javax.net.ssl.SSLHandshakeException: sun.security.validator.ValidatorException: PKIX path building failed: sun.security.provider.certpath.SunCertPathBuilderException: unable to find valid certification path to requested target
Hence to make your Java runtime environment trust the certificate, you need to import it into the JRE certificate store explicitly. Today in this blog I will help you how you can do this into your system.
 
  • Step 1 - Extract the connecting site certificate from your browser. 
In google chrome browser, open the site, and then press F12. Now navigate to the "Security" tab and then click on view certificate.
A pop-up screen will open showing you "General" details of the certificate. Now click on the "Details" tab and in the bottom you will find the "Export" option. Click on Export. a saving pop-up will get open asking you for the saving location. Make sure to select the "DER-Encoding" format before you click on the save.
 
  • Step 2 - Import the certificate into the Java Key Store
Now, as we have extracted the certificate and saved it into the system, hence the next step is to import the certificate into the Jave key store. Make sure you have write access to your JRE and use the keytool utility to import on Ubuntu. In my case the JRE is installed on the following location:
 
/usr/lib/jvm/jdk1.7.0_80
 
Hence the certificate file in which we have to add the extracted certificate is located at:
 
/usr/lib/jvm/jdk1.7.0_80/jre/lib/security/cacerts
 
Now to import the certificate using key store, use the following command:
 
keytool -import -alias test_certificate -keystore /usr/lib/jvm/jdk1.7.0_80/jre/lib/security/cacerts -file /home/kamaldeep/Desktop/test.site.com
 
Where:
test_certificate : is the unique alias name to denote the imported certificate
/usr/lib/jvm/jdk1.7.0_80/jre/lib/security/cacerts : is the location of the Java default certificate
/home/kamaldeep/Desktop/test.site.com : is the location of the extracted certificate.
 
You will be prompted for the keystore password, which is by default changeit.
 
  • Step 3 - Import the certificate into the Java application
Now before you make any connections from your Java application, you may also be required to import the certificate explicitly into the application by setting the system property in the following manner
 
System.setProperty("javax.net.ssl.trustStore", "/usr/lib/jvm/jdk1.7.0_80/jre/lib/security/cacerts");
System.setProperty("javax.net.ssl.trustStorePassword", "changeit");
 
That's all we have to do to resolve.
Lazy Load Images Plugin for jQuery

Lazy Loading JQuery

Hi.. Does your site take too much time to get loaded because of way too many images?

And what about those images which are at the bottom of your site which user hardly went up to but still getting loaded in page load?
Yeah, thats the problem!!


What if your image get loaded only when you scroll to that particular section/viewport where your image is. Does seems Nice :) ?
In this blog I will tell you how you can implement the Lazy Load plugin in your jQuery application to load the images only when required making your page load lightening faster. Images outside of viewport are not loaded until user scrolls to them. This is opposite of image preloading. This also helps in reducing the server load as well. Before we get into this implementation lets have a demo of it by clicking on the following links:

The plugin only works with jQuery. To implement the plugin follow these steps:

Step 1: Download the LazyLoad plugin from the following link:
https://www.appelsiini.net/projects/lazyload/jquery.lazyload.js


Step 2: Make sure to include both jQuery and LazyLoad plugin in your HTML code:

<script src="jquery.js"></script>
<script src="jquery.lazyload.js"></script>
  

Step 3: Alter your image tags by adding the address of the image in the data-original attribute. And add a class to your images so that you can easily control to which images plugin is bound to.

<img class="lazy" data-original="img/example.jpg">

Step 4: Initialize the lazy loading of images by calling this function in the JavaScript

$(function() {
	$("img.lazy").lazyload();
});

This will cause all images of class lazy to be lazy loaded. See the Basic Options demo.

Thats all you have to do. Along with this there are certain properties which you can set to handle the loading of images as per your need:


Setting Threshold
If you want images to load earlier before actually going to the view port, use threshold parameter. Setting threshold to 400 will causes image to load 400 pixels before it appears on viewport. Example:

$("img.lazy").lazyload({
	threshold : 400
});

Setting Event to Trigger Loading
You can use jQuery event such as click or mouseover to load the images. Default is to wait until user scrolls down and image appears on the viewport. To load images only when user clicks them you could do:

$("img.lazy").lazyload({
	event : "click"
});

Using Effects
To add the fadeIn effect, use the following sample code. By default plugin waits for image to fully load and calls show() function.

$("img.lazy").lazyload({
	effect : "fadeIn"
});

For more details checkout this link

Thanks


Change MySql ROOT password

Change MYSQL Root Password

Hi.. If you ever forgot the MySQL root user password and can’t remember and wanna break, then you can reset the MySQL database password from the command line. But make sure you must know any of the user and password of the system you are on, this is for MySQL 5.7 onwards:

Step 1: First stop the MySQL using the following command:

sudo service mysql stop

Step 2: Start the MySQL in safe mode:

sudo mysqld_safe --skip-grant-tables

Step 3: This will be an ongoing command until the process is finished so open another shell/terminal window, and log in without a password as root:

myself -u root

Step 4: Flush all the privileges as:

FLUSH PRIVILEGES;

Step 5: Alter the root user password:

ALTER USER 'root'@'localhost' IDENTIFIED BY 'MyNewPass';

Step 6: Quit the MySQL terminal: \q

step 7: Restart the MySQL services:

sudo service MySQL restart

Thats all you need to do. Now your root user's password will be updated with what you have provided.
Thanks

Install Custom Java version in Linux

Custom JAVA Linux

Hi folks, I have seen many a times that there is project requirement to use some old java version installation but as your system is already upgraded to the latest version you find it difficult to install it in one go. Most important, you don't need to worry about your default installation. So follow the below steps to install the required version of java in your system:


Step 1: Download the required version of JDK from the following link:
http://www.oracle.com/technetwork/java/archive-139210.html#javase
Here select the major version of JDK and on the next page download the specific minor version of the selected major version like "Java SE Development Kit 7u51" to download JDK 7u51. Make sure to accept the License Agreement and then download the .tar.gz extension file against the Linux platform. I assume that you have downloaded the JDK in the /home/user/Downloads directory.

Step 2: Now extract the .tar using the following command in your /home/user/Downloads directory
tar -xvzf [your_file_name]
Example:

tar -xvzf jdk-8-linux-x64.tar.gz

Step 3: Create jvm folder in /usr/lib, if jvm folder doesn't exist using the following command:

sudo mkdir /usr/lib/jvm
 

Step 4: Move the extracted jdk folder to /usr/lib/jvm location. Follow the command being in your /home/user/Downloads directory

sudo mv {your_folder_name} /usr/lib/jvm

Step 5: Install the java source in system:
sudo update-alternatives --install /usr/bin/javac javac /usr/lib/jvm/{your_folder_name}/bin/javac 1
sudo update-alternatives --install /usr/bin/java java /usr/lib/jvm/{your_folder_name}/bin/java 1
sudo update-alternatives --install /usr/bin/javaws javaws /usr/lib/jvm/{your_folder_name}/bin/javaws 1

Example:

sudo update-alternatives --install /usr/bin/javac javac /usr/lib/jvm/jdk1.8.0/bin/javac 1
sudo update-alternatives --install /usr/bin/java java /usr/lib/jvm/jdk1.8.0/bin/java 1
sudo update-alternatives --install /usr/bin/javaws javaws /usr/lib/jvm/jdk1.8.0/bin/javaws 1

Step 6: Now following are the major steps which help you to switch your java version at any point of time. To choose the default java follow these commands to select the java, javac or the javaws version:

sudo update-alternatives --config javac
sudo update-alternatives --config java
sudo update-alternatives --config javaws

Running these individual commands will ask you for the version of java. Type in the number against the java version which you want and press enter. Make sure that you select the same java version in all the configuration selection.

Step 7: Test the java version by running the following command:

java -version

It will give you the default version of java used by the system.

Step 8: Configure JAVA_HOME. Type the following command in your terminal:

sudo gedit /etc/profile

Add following lines in end:
JAVA_HOME=/usr/lib/jvm/{your_folder_name}
export JAVA_HOME

Example:

JAVA_HOME=/usr/lib/jvm/jdk1.7.0
export JAVA_HOME

Step 9: Restart your system or you can load your updated source file by running the below command

source /etc/profile

Thats all for now. Write comments for any queries.


Thanks

Monitor Linux server from Android

Monitor LINUX server from Android

Hi, folks. In my previous blog, I focused on how you can establish an ssh connection using a private key. In this tutorial, I will guide how you can monitor your server statistics live using an android device. Yes true via your Android device using "JuiceSSH Performance" an application from "Sonelli Ltd" which is a plugin app for "JuiceSSH Client" application. To use this you need to have installed JuiceSSH Client on your mobile and also have the connection established to the server. For connection, establishment read my previous blog. To monitor the server, install the "JuiceSSH Performance" on your android device by clicking here. After you have installed, open the application and allow it to use the JuiceSSH to make connections to the server. Now to view the real-time server stats, select the connection from the top drop-down which you have already established in the "JuiceSSH - SSH Client" and then click "Connect". With this a connection will be established to the server and will display you the following logs:

CPU Usage
Free RAM
Average Load
Network Traffic
Disc Usage

You can even fork this plugin on GitHub to customize it according to your needs. Here is the link

THANKS

SSH connection to linux server from Android device

Hi, developers. Hope you are doing well!! But think about a situation in which you are not in reach of your computer and unfortunately you get a phone call informing server issues. Suppose if everything gets down on a live server machine and you don't have a laptop with you to have an SSH. Well, the solution to the above problem is now available. All you need is an Android phone and install the app named "JuiceSSH - SSH Client". The app is build by "Sonelli Ltd". Click here to download

In this tutorial, I will guide you how you can build up an SSH connection to your remote Linux server using the pem file. Make sure that your server accepts public logins instead of just the whitelisted IP or you can only access via a whitelisted IP connection. In order to set up a new SSH connection you will need the following details from your server:

  • Public address
  • SSH Port (22 by default)
  • Username
  • Private Key or Password
  • A working internet connection

Step 1: Install the Juice SSH on your Android device by clicking here

Step 2: Open the app and click on Connections at the top

Step 3: Click on the plus icon on the bottom right and then provide the server details starting with providing the nickname to this connection.


For this example we'll assume that your server's address is myserver.example.com, the SSH service is running on port 92, your username is testuser and your private key file has been copied to the SD-Card of your Android device. With these assumptions, the data will be filled in the following way:


Step 4: To provide the username and the pem file/password details, click on Identity and select new and define the new identity. Identities contain authentication details and can be reused for multiple connections.

Step 5: To provide the password to the user click on "Password" or to provide the Pem file click on "Private Key". In this example, I have set the private key. To import the private key, click on "Smart Search". The interface will automatically search the pem file from your mobile storage. Select the file and click OK.

After you have successfully set the private key, you will see the following screen

Close the window by clicking on the tick icon on the top right of your screen.

Step 6: After following the above steps, you will see a new connection created under the connections tab. Select the connection to establish the connection to the server.

A connection window will open showing you the progress of connection.


That's all for now. In my next blog, I will share how you can see monitor the server performance via SSH on Android.

Thanks


How to Revert a Commit Already Pushed to a Remote Repository How to Revert a Commit Already Pushed to a Remote Repository


In this blog I would like to tell you how to revert your last commit from git hub. There may be a case when you realize that one of the commits should not be there, or that there was some unacceptable typo in it. So that isn't a big problem. All you need to take care of is that you should do it fast before anyone fetches the bad commits.


This can be done in two ways :-

  • Correct the mistake in a new commit
  • Revert the full commit


Correct the mistake in a new commit

This is simple as you just need to remove or fix the bad file in a new commit and push it to the remote repository. This is the most natural way to fix an error, always safe and totally non-destructive, and how you should do it 99% of the time. Yet the bad commit remains there and accessible, but this is usually not a big deal.


Revert the full commit

In this case, instead of going through all the changes manually your whole previous commit will be reverted. Reverting a commit means to create a new commit that undoes all changes that were made in the bad commit. Just like above, the bad commit remains there, but it no longer affects the the current master and any future commits on top of it. To do this, first reset the branch to the parent of the current commit, then force-push it to the remote as follows.

                $git reset HEAD^ --hard
                $git push -f


For more details, Click Here

THANKS

Configure Nginx web server Configure Nginx web server


NGINX is a free, open-source, high-performance HTTP server which is designed to deliver large amounts of static content quickly with efficiently. Nginx uses an asynchronous and scalable event-driven model which provides more predictable performance under load. But before proceeding further, I would like you to know about installation.


Installing NGINX:-

The simplest way to install Nginx in Ubuntu is by downloading it from Debian’s repositories. Run the following command in terminal to install NGINX


                sudo apt-get install nginx


After successful installation, you can loacte the NGINX files in the "/etc/nginx/" directory. The primary configuration file is "/etc/nginx/nginx.conf"


Now before proceeding further, let me tell you about some of the basic commands.

  • sudo service nginx start To start the NGINX server.
  • sudo service nginx stop To stop the NGINX server.
  • sudo service nginx restart To restart the NGINX server.
  • sudo nginx -t To test the NGINX configuration for syntax errors.


Now you’re ready to make changes to your Nginx configuration. Whenever you make a change to the nginx.conf file, you need to reload your configuration before the change will take effect.

Here is the sample code which I will explain.

                server {
                        listen 80 default_server;
                        listen [::]:80 default_server ipv6only=on;

                        root /usr/share/nginx/html;
                        index index.html index.htm;

                        # Make site accessible from http://localhost/
                        server_name localhost;

                        location / {
                                # First attempt to serve request as file, then
                                # as directory, then fall back to displaying a 404.
                                try_files $uri $uri/ /index.html;
                        }
                }


  • server Tells this is the start of server configuration.
  • listen Tells Nginx the hostname/IP and the TCP port where it should listen user requests for HTTP connections. By default, Nginx will listen on port 80 for HTTP connections
  • root This describes where is the path to the project files. In the above example, the index.htm is saved in /usr/share/nginx/html/index.html
  • index Tells Nginx which file to serve if none is specified
  • server_name The domain name is specified in the server_name variable
  • location Tells Nginx what to respond to requests for resources within the server


THANKS


So this was all about NGINX installation and configuration. Hope this thing works. For detailed information, visit the following link https://www.nginx.com/resources/wiki/

How to detect browser window close action

In my previous blog I have explained how to Prevent Internet Explorer from caching http calls so that each time you can get fresh data from the server. Here is its link: Prevent Internet Explorer from caching http calls

Now in this blog, I will let you know how to detect browser window close action. Now this action may be sometimes required where you want to perform some kind of function on window close. Say you may be required to call Logout function on a secured website. Now this functionality can be done by the following line of javascript code

<html>
    <head>
        <title>Hello</title>
        <script type="text/javascript" language="Javascript">

            function DetectBrowserExit() {
               alert('Here you can execute task you want');
            }

            window.onbeforeunload = function() {
                DetectBrowserExit();
            }

        </script>
    </head>
    <body>
        Close this browser to notice the browser close event
    </body>
</html>

And if we talk about its browser compatibility, I have tested this in following browsers:-

  • Google Chrome
  • Internet Explorer
  • Mozilla Firefox
  • Safari

Thats all for now. 


THANKS


Using ngCloak to prevent Angular html template display raw content in browser.

In this blog, I will let you know how to prevent the Angular html template from being briefly raw content in browser. Many a times in heavy applications, on page reload, it is possible that your controller may not bind immediately with the HTML. Hence this will lead to display raw data i.e. something in {{....}} form. This can be prevented by using ngCloak directive in angularjs. By applying in body, this directive gets applied in whole page. But the preferred usage is to apply multiple ngCloak directives to small portions of the page to permit progressive rendering of the browser view i.e. as soon as the data of particular portion is rendered by controller, that portion will be displayed.

To make your ngCloak work perfectly, add the following css rule in your custom css

[ng\:cloak], [ng-cloak], [data-ng-cloak], [x-ng-cloak], .ng-cloak, .x-ng-cloak {
 display: none !important;
}

Now in your HTML, you can use this as one of the way:-

<div id="template1" ng-cloak>{{ 'Hello world 1' }}</div>
<div id="template2" class="ng-cloak">{{ 'Hello World 2' }}</div>

Thats all you have to do.


THANKS

Prevent Internet Explorer from caching http calls

In this blog, I will let you know how to prevent Internet Explorer browser to cache ajax http calls.

Recently I met with a problem in which I was not able to get the updated data from server in IE. This case was generated on second time call. Having the same parameters, the server gives response to the first $http call but denies further $http calls on same URL with same parameter. As IE used to cache the values of first call made. Yes there could be case where you actually get the same response via requesting the same request parameter but if your API is returning different values on same API with the same parameter then this is gonna be prevented in Internet Explorer. So to prevent this, add the following lines of code in your angular configuration block as :
var mainApp = angular.module('mainApp', ['config']);

mainApp.config(['$httpProvider'function( $httpProvider) {
    if (!$httpProvider.defaults.headers.get) {
        $httpProvider.defaults.headers.get = {};
    }
    $httpProvider.defaults.headers.get['If-Modified-Since'] = 'Mon, 26 Jul 1997 05:00:00 GMT';
    $httpProvider.defaults.headers.get['Cache-Control'] = 'no-cache';
    $httpProvider.defaults.headers.get['Pragma'] = 'no-cache';
}]);


Hope this thing helps you.

THANKS

SQL query to update rows in same table based on another row in the same table

In this blog, I will let you know how to update a row in a SQL table based on another row in the same table.


While I was working with SQL, I got stuck into a problem where, there was a need to update a row content based on another row. And that the content also need to be updated from the content of the same table row itself.


First let me describe you my problem. Lets say there is a table notification. Now what I was supposed to do is:

Copy “Subject” field of row1 into row2 where row1's “Notification_ID”  =  row2's “Notification_ID” and row1's “language” should only be ‘English’ and row2's “language” could be either ‘French’ or ‘Japanese’ AND row1's “type” should be ‘SMS’ and row2's “type” should be ‘Internal’. For this let me provide you some sample data:
 

language

message

notification_id

subject

type

ENGLISH

NOTIF001 ENGLISH

NOTIF001

Buy coins1

INTERNAL

FRENCH

NOTIF001 FRENCH

NOTIF001

Buy coins2

INTERNAL

JAPANESE

NOTIF001 JAPANESE

NOTIF001

Buy coins2

INTERNAL

ENGLISH

NOTIF001 ENGLISH

NOTIF001

Buy coins3

SMS

FRENCH

NOTIF001 FRENCH

NOTIF001

Buy coins3

SMS

JAPANESE

NOTIF001 JAPANESE

NOTIF001

Buy coins3

SMS

ENGLISH

NOTIF002 ENGLISH

NOTIF002

Sell coins1

INTERNAL

FRENCH

NOTIF002 FRENCH

NOTIF002

Sell coins2

INTERNAL

JAPANESE

NOTIF002 JAPANESE

NOTIF002

Sell coins2

INTERNAL

ENGLISH

NOTIF002 ENGLISH

NOTIF002

Sell coins3

SMS

FRENCH

NOTIF002 FRENCH

NOTIF002

Sell coins3

SMS

JAPANESE

NOTIF002 JAPANESE

NOTIF002

Sell coins3

SMS

ENGLISH

NOTIF005 ENGLISH

NOTIF005

Trade coins1

INTERNAL

FRENCH

NOTIF005 FRENCH

NOTIF005

Trade coins2

INTERNAL

JAPANESE

NOTIF005 JAPANESE

NOTIF005

Trade coins2

INTERNAL

ENGLISH

NOTIF005 ENGLISH

NOTIF005

Trade coins3

SMS

FRENCH

NOTIF005 FRENCH

NOTIF005

Trade coins3

SMS

JAPANESE

NOTIF005 JAPANESE

NOTIF005

Trade coins3

SMS


Now after hitting these statements,

UPDATE notification pd
INNER JOIN notification pd2 ON (
	pd.notification_id = pd2.notification_id AND
    pd.language = 'ENGLISH' AND(
		pd2.language = 'JAPANESE' OR
        pd2.language = 'FRENCH'
	) AND
    pd2.type = 'INTERNAL' AND
    pd.type = 'SMS'
) SET pd2.subject= pd.subject;


You will get following output.


language

message

notification_id

subject

type

ENGLISH

NOTIF001 ENGLISH

NOTIF001

Buy coins1

INTERNAL

FRENCH

NOTIF001 FRENCH

NOTIF001

Buy coins3

INTERNAL

JAPANESE

NOTIF001 JAPANESE

NOTIF001

Buy coins3

INTERNAL

ENGLISH

NOTIF001 ENGLISH

NOTIF001

Buy coins3

SMS

FRENCH

NOTIF001 FRENCH

NOTIF001

Buy coins3

SMS

JAPANESE

NOTIF001 JAPANESE

NOTIF001

Buy coins3

SMS

ENGLISH

NOTIF002 ENGLISH

NOTIF002

Sell coins1

INTERNAL

FRENCH

NOTIF002 FRENCH

NOTIF002

Sell coins3

INTERNAL

JAPANESE

NOTIF002 JAPANESE

NOTIF002

Sell coins3

INTERNAL

ENGLISH

NOTIF002 ENGLISH

NOTIF002

Sell coins3

SMS

FRENCH

NOTIF002 FRENCH

NOTIF002

Sell coins3

SMS

JAPANESE

NOTIF002 JAPANESE

NOTIF002

Sell coins3

SMS

ENGLISH

NOTIF005 ENGLISH

NOTIF005

Trade coins1

INTERNAL

FRENCH

NOTIF005 FRENCH

NOTIF005

Trade coins3

INTERNAL

JAPANESE

NOTIF005 JAPANESE

NOTIF005

Trade coins3

INTERNAL

ENGLISH

NOTIF005 ENGLISH

NOTIF005

Trade coins3

SMS

FRENCH

NOTIF005 FRENCH

NOTIF005

Trade coins3

SMS

JAPANESE

NOTIF005 JAPANESE

NOTIF005

Trade coins3

SMS


So via this I implemented INNER join in the same table.


THANKS


Creating addon in nodejs Using JavaScript Timing Events setInterval(); and setTimeout();

Before begining, let me give you a breif idea about some terms

  • node-gyp- is a cross-platform command-line tool written in Node.js for compiling native addon modules for Node.js
  • NAN- is a thin abstraction layer between the C++ code we write and the Node and V8 APIs

Steps to create your first addon are:-

  • Run "npm init" to create package.json in your project root directory

While creating package.json specify your js file as "main": "hello.js"

  • (optional) Add a "gypfile": true entry to your package.json so that npm knows this is a binary addon that needs compiling and it needs to invoke node-gyp.
  • Install NAN node module in your project root package via "npm install nan@latest --save"
  • Create "binding.gyp" describing your source file here it is hello.cc and also define target_name defining the name of your node file i.e. hello.node. In this file, we also define our NAN module.
                    {
                        "targets": [
                            {
                                "target_name": "hello",
                                "sources": [ "hello.cc" ],
                                "include_dirs": [
                                    "<!(node -e \"require('nan')\")"
                                ]
                            }
                        ]
                    }
                
  • Write code in hello.cc to print "Hello World"
                    #include <node.h>
                    
                    namespace demo {

                        using v8::FunctionCallbackInfo;
                        using v8::Isolate;
                        using v8::Local;
                        using v8::Object;
                        using v8::String;
                        using v8::Value;
                        
                        void testMethod(const FunctionCallbackInfo<Value>& args) {
                            Isolate* isolate = args.GetIsolate();
                            args.GetReturnValue().Set(String::NewFromUtf8(isolate, "Hello World"));
                        }
                        
                        void init(Local<Object> exports) {
                            NODE_SET_METHOD(exports, "hello", testMethod);
                        }
                        
                        NODE_MODULE(addon, init)
                        
                    }
                
  • Compile your addon by running "node-gyp configure". In the ./build/ directory, a Makefile and associated property files will be created. If you don't have gyp install it via "sudo npm install node-gyp -g"
  • Next, run "node-gyp build" to start the build process

Alternatively you can use "node-gyp rebuild" to combine the configure and build

The binary output target is called "hello", we will end up with a "hello.node" file either in ./build/Release/ or ./build/Debug/ depending on how node-gyp is invoked and your environment variables.

  • Create a file called hello.js with the following contents:
                    var addon = require('./build/Release/hello.node');
                    console.log(addon.hello());
                

Here hello() is the name of funtion you have defined in NODE_SET_METHOD(exports, "hello", testMethod);

In this, the first line is responsible for loading our compiled add-on and pulling in the exports to our module.

  • To run the program, simply write "node hello.js" in your project root directory.

Finally to create your first node addon, all you need is

  • hello.cc (your C prog)
  • building.gyp (Defining targets)
  • hello.js (to run your program)

For full documentation, refer to https://nodejs.org/api/addons.html


THANKS

Using JavaScript Timing Events setInterval and setTimeout Using JavaScript Timing Events setInterval(); and setTimeout();


Using, JavaScript the ability to execute some code at specified time-intervals is called timing events. For this, we use two key methods i.e. setInterval(); and setTimeout();


  • setInterval(); -This method executes a function again and again, at custom specified time intervals.
  • setTimeout(); -This method executes a function only once, after waiting a specified number of milliseconds.


Note: As these both methods are of HTML DOM Window object hence they are more supported than any other javascript interval. Like we use $interval in angularjs which is not supported in Internet Explorer.


setInterval();


As already told, the setInterval(); will consistently execute a function after specified number of milliseconds. The general syntax for this is :-

                setInterval("javascript function", milliseconds);


Here in this, the first parameter indicates a function. And the second one is the duration of time interval for each execution.

Example:-

                $scope.load = function() {
                    console.log(“Function called”);
                    }
                setInterval($scope.load, 10000);


In the above example, setInterval will call the load function after every 10 seconds.


Note: There are 1000 milliseconds in one second.


Stop the Execution of setInterval();


To stop the further execution of setInterval(), clearInterval() method is used. The general syntax for this is :-

                clearInterval(intervalVariable);
            

Here, intervalVariable defines the global variable denoting the setInterval() as:-

                Var myVar=setInterval("javascript function", milliseconds);
            

Now to stop the execution, simply pass the myVar in clearInterval() as :-

                clearInterval(myVar);


Example:-

In HTML add a button to stop the interval as:-

                <button ng-click="clearInterval()">Stop time</button>
            

And in your javascript write the function description to stop the interval

                $scope.load = function() {
                    console.log(“Function called”);
                }
                
                $scope. clearInterval = function() {
                    clearInterval(myVar);
                }
                
                Var myVar= setInterval($scope.load, 10000);


setTimeout();


As already told, the setTimeout() will executes a function only once, after waiting a specified number of milliseconds. The general syntax for this is :-

                setTimeout("javascript function", milliseconds);
            

Here in this, the first parameter indicates a function. And the second one is the duration of time interval for each execution.


Example:-

In your HTML, you have called a function on button click as:-

                <button ng-click = "executeOnce()">Try it once</button>
            

And in your javascript write the function description to start the timer

                $scope.executeOnce = function() {
                    setTimeout($scope.load, 10000);
                }
                
                $scope. load = function() {
                    console.log(“Function called”);
                }
            

In the above example, on clicking the “Try it once” button, executeOnce function will be called which will set execution time on load function. Now when the executeOnce function will be called, from there load function will be called only once and that too after 10 seconds.


Stop the Execution of setTimeout();

To stop the execution of the function specified in the setTimeout() method, clearTimeout() method is used. The general syntax for this is :-

                clearTimeout(intervalVariable);
            

Here, intervalVariable defines the global variable denoting the setTimeout().

                Var myVar=setTimeout("javascript function", milliseconds);
            

Now to stop the execution, simply pass the myVar in clearTimeout() as :-

                clearTimeout(myVar);


Example:-

In HTML add a button to stop the interval as:-

                <button ng-click="clearTimeout()">Stop time</button>
            

And in your javascript write the function description to stop the interval

                $scope.load = function() {
                    console.log(“Function called”);
                }
                
                $scope. clearTimeout = function() {
                    clearTimeout(myVar);
                }
                
                Var myVar= setTimeout($scope.load, 10000);
            

Now in this case, you will be able to stop the execution by calling the clearTimeout() method as the setTimeout() function has not already been executed.


So this was all about using JavaScript Timing Events setInterval(); and setTimeout();. The best example of setInterval(); is the clock. Hope you liked the article. For queries do comment in the comment section.


How to access your config.groovy values in controller. How to access your config.groovy values in controller.

In this blog I would like to share that how to access your config.groovy values in controller.

There would be times when you need to access your config.groovy values in your controller. As an example, I was supposed to use "endpointUrl" value in a spring security rest plugin to get the login api URL. While searching, I found this useful

So to implement this, we have to first know the complete variable property name

For an example, Lets say we have to access a value from config.groovy stored as:-

                grails.plugin.springsecurity.rest.login.endpointUrl = "/api/login"
            

Now to access this in your controller, first you need to import

                import grails.util.Holders;
            

in your controller. And then access the endpointUrl value by writting :-

                Strint endpointUrl = Holders.getFlatConfig().get( "grails.plugin.springsecurity.rest.login.endpointUrl")
            

Thats all you need to do.

For any query, feel free to ask in the comment section.


Accessing values from one controller to another using on, broadcast and emit in angularjs Accessing values from one controller to another using $on, $broadcast and $emit in angularjs


First let me give you a brief overview on $on, $broadcast and $emit


$on

The $on listens on events of a given type.

The general syntax for this is:

                $on(name, listener);
            

Where:

  • Name: Event name to listen on.
  • Listener: Function to call when the event is emitted.


$emit

The $emit dispatches an event name upwards in the controller scope hierarchy notifying the $on listeners. When $emit is called, traversing upwards all listeners along the way listening for name event on this scope get notified. The event will stop propagating if one of the listeners cancels it.

The general syntax for this is:

                $emit(name, args);
            

Where:

  • Name: Event name to emit.
  • Args: Arguments which will be passed onto the event listeners.


$broadcast

The $broadcast Dispatches an event name downwards in the controller to all child scopes (and their children) notifying the $on listeners. The event life cycle starts at the scope from where $broadcast was called. When $broadcast is called, traversing downwards all listeners along the way listening for name event on this scope get notified. The event cannot be canceled.

The general syntax for this is:

                $broadcast(name, args);
            

Where:

  • Name: Event name to broadcast.
  • Listener: Arguments which will be passed onto the event listeners.


Example:

                app.controller('FirstController', function($scope){
                    $scope.LoginFromFirst = function(){
                        $scope.$broadcast('CallFunction', $scope.name)
                    }
                });

                app.controller('SecondController', function($scope){
                  $scope.$on('CallFunction', function(events, args){
                    alert(“Logged In ”+args);
                  })
                });

                app.controller('ThirdController', function($scope){
                  $scope.LoginFromThird = function(){
                        $scope.$emit('CallFunction', $scope.name)
                    }
                });


How to override a plugin class with custom class in groovy grails. Override a plugin class with custom class in groovy grails.


As such Grails configuration happens at runtime therefore, each plugin may configure Spring beans as a reference to which beans are configured i.e. refer to the reference guide which describes each of the Grails plugins and which beans they configure. So in order to override existing one, register new beans by configuring them in “grails-app/conf/spring/resources.groovy”. Beans are defined inside a beans property

                beans = {
                    // beans here
                }
            

To implement this, simply write your original class and in braces, define your custom class with complete path.


Example: In the following example, I am overriding Spring restAuthenticationFilter class with CustomRestAuthenticationFilter which is kept in com.authentication package

                beans = {
                    restAuthenticationFilter(com.authentication.CustomRestAuthenticationFilter)
                }
            

Now when your application runs, restAuthenticationFilter class will be overriden by CustomRestAuthenticationFilter.

Further if restAuthenticationFilter is using some dependencies or service like credentialsExtractor or authenticationManager, you can define them too by first importing the original ones and then defining their references as:-

                service_name_used_in_custom_class = ref("service_name_used_in_original_class") :-


Lets have an example:-

                import org.springframework.security.authentication.AuthenticationDetailsSource;
                import org.springframework.security.authentication.AuthenticationManager;
                import org.springframework.security.web.authentication.AuthenticationFailureHandler;
                import org.springframework.security.web.authentication.AuthenticationSuccessHandler;

                import com.odobo.grails.plugin.springsecurity.rest.credentials.CredentialsExtractor;
                import com.odobo.grails.plugin.springsecurity.rest.token.generation.TokenGenerator;
                import com.odobo.grails.plugin.springsecurity.rest.token.storage.TokenStorageService;

                beans = {
                    restAuthenticationFilter(com.authentication.CustomRestAuthenticationFilter) {
                        credentialsExtractor = ref("credentialsExtractor")
                        authenticationManager = ref("authenticationManager")
                        authenticationSuccessHandler = ref("authenticationSuccessHandler")
                        authenticationFailureHandler = ref("authenticationFailureHandler")
                        authenticationDetailsSource = ref("authenticationDetailsSource")
                        tokenGenerator = ref("tokenGenerator")
                        tokenStorageService = ref("tokenStorageService")
                    }
                }
            

So this was all about overriding a grails plugin class with a custom one.


Using Angular Table to add sortable, paginated tables Using Angular Table to add sortable, paginated tables

Angular Table directive allows you declare sortable tables with pagination. Instead of using ng-repeat to iterate array object and further adding more code to perform pagination, sorting Angular table does this for you with a little effort.


Features:-

  • Adds sorting to any column
  • Adds pagination
  • Display cell contents by name convention or allows custom cell content.
  • Display header titles by name convention or allows custom header.


Required Dependencies:-

  • To use angular table, angular 1.2 or higher is required.
  • You need to include angular-table.js or angular-table.min.js in your HTML.

You can find one from here: https://github.com/samu/angular-table/tree/master/dist

  • Inject the angular table dependency in your app.js as follows:-
                angular.module('myApp', ['angular-table']);


How to use:-

Suppose we have a list of data in our controller say:-

                $scope.dataList = [
                    { name: 'indicator1' , description: 'blah1', essential: true },
                    { name: 'indicator2' , description: 'blah2', essential: false },
                    { name: 'indicator3' , description: 'blah3', essential: true },
                    { name: 'indicator4' , description: 'blah4', essential: false }
                ];
            

Now to represent this data in a nice, sortable html table and eventually make it paginated, lets write some markup in our HTML

                <table at-table at-list="dataList">
                    <thead></thead>
                    <tbody>
                        <tr>
                            <th at-implicit at-attribute="name"></th>
                            <th at-implicit at-attribute="description"></th>
                            <th at-implicit at-attribute="essential"></th>
                        </tr>
                    </tbody>
                </table>


Result:-

This displays a simple html table with an automatically generated header (from key) and showing every entry in our list. The attributes are used as follows:-

  • at-table - Indicate that we want to use the angular-table directive to extend our table
  • at-list - Point to the data source in our controller scope (Here its dataList)
  • at-attribute - It is the key object to the respective columns.
  • at-implicit - If used, it automatically shows implicit values from dataList and render the content of each object's attribute defined in the at-attribute. If not then it will display the content displayed between <td>....</td>
  • <thead> </thead> - This will automatically display the relevant headings corresponding to at-attribute defined in <tbody> </tbody>

Now to add sorting to columns, add at-sortable as:-

                <td  at-implicit at-attribute="name" at-sortable></td>
            

If we you want to display data in sorted order on page load use at-initial-sorting="desc" or use at-initial-sorting="asc" as:-

                <td  at-implicit at-attribute="name" at-sortable at-initial-sorting="desc"></td>
            

To provide custom headings define like this:-

                <th at-attribute="name">First Name</th>
                <th at-attribute="description">Employee Description</th>
                <th at-attribute="essential">Essential</th>
            

To add pagination, you need to define a configuration for the table :-

                <table at-table at-config="config" at-list="dataList" at-paginated>...</table>
            

And to display the additional pagination element to our view write:-

                <at-pagination at-config="config" at-list="dataList"></at-pagination>
            

The at-config, properties need to be defined in controller as follows:-

                $scope.config = {
                    itemsPerPage: 5,
                    maxPages:3,
                    fillLastPage: false
                }
            
  • itemsPerPage - Indicate number of rows per page.
  • maxPages – Maximum number of pages to show in pagination bar.
  • fillLastPage – How should it fill the last page with less number of rows.

These were the steps that are useful for implementing angular table.


Let me give you a detailed example:-

                <table at-table at-config="config" at-list="dataList" at-paginated>
                    <thead>
                        <tr>
                            <th at-attribute="name">First Name</th>
                            <th at-attribute="description">Employee Description</th>
                            <th at-attribute="essential">Essential Data</th>
                        </tr>
                    </thead>
                    <tbody>
                        <tr>
                            <td at-implicit at-attribute="name" at-sortable at-initial-sorting="desc"></td>
                            <td at-implicit at-attribute="description" at-sortable></td>
                            <td at-implicit at-attribute="essential" at-sortable></td>
                        </tr>
                    </tbody>
                </table>

                <at-pagination at-config="config" at-list="dataList"></at-pagination>
            

The above markup will produce a sortable, paginated table having initial sorting on name feild in descending order. This will have custom headings i.e. First Name, Employee Description and Essential Data.


For demo:

http://bit.ly/1KecLjs


Banner

Don't just hire talent,
But build your dream team

Our experience in providing the best talents in accordance with diverse industry demands sets us apart from the rest. Hire a dedicated team of experts to build & scale your project, achieve delivery excellence, and maximize your returns. Rest assured, we will help you start and launch your project, your way – with full trust and transparency!