|
Pawanpreet Singh Oodles

Pawanpreet Singh (Manager-Solutions Architect)

Experience:12+ yrs

Pawanpreet is an seasoned Project Manager with a wealth of knowledge in software development, specializing in frontend and mobile applications. He possesses a strong command of project management tools, including Jira, Trello, and others. With a proven track record, he has successfully overseen the delivery of multiple software development projects, managing budgets and large teams. Notable projects he has contributed to include TimeForge, Yogyata, Kairos, Veto, Inspirien App, and more. Pawanpreet excels in developing and maintaining project plans, schedules, and budgets, ensuring timely delivery while staying within allocated resources. He collaborates closely with clients to define project scope and requirements, establish timelines and milestones, and effectively manage expectations. Regular project status meetings are conducted by him, providing clients and stakeholders with consistent updates on project progress, risks, and issues. Additionally, he coaches and mentors project leads, offering guidance on project management best practices and supporting their professional development.

Pawanpreet Singh Oodles
Pawanpreet Singh
(Solutions Architect)

Pawanpreet is an seasoned Project Manager with a wealth of knowledge in software development, specializing in frontend and mobile applications. He possesses a strong command of project management tools, including Jira, Trello, and others. With a proven track record, he has successfully overseen the delivery of multiple software development projects, managing budgets and large teams. Notable projects he has contributed to include TimeForge, Yogyata, Kairos, Veto, Inspirien App, and more. Pawanpreet excels in developing and maintaining project plans, schedules, and budgets, ensuring timely delivery while staying within allocated resources. He collaborates closely with clients to define project scope and requirements, establish timelines and milestones, and effectively manage expectations. Regular project status meetings are conducted by him, providing clients and stakeholders with consistent updates on project progress, risks, and issues. Additionally, he coaches and mentors project leads, offering guidance on project management best practices and supporting their professional development.

LanguageLanguages

DotHindi

Bilingual

DotPunjabi

Fluent

DotEnglish

Conversational

Skills
Skills

DotTechnical Project Management

100%

DotAngular/AngularJS

80%

DotProject Management

100%

DotJavascript

80%
ExpWork Experience / Trainings / Internship

Sep 2012-Present

Technical Project Manager

Gurugram, India


Oodles Technologies

Gurugram, India

Sep 2012-Present

EducationEducation

2008-2012

Dot

Punjab Technical University

B.Tech -Computer Science

certificateCertifications
Dot

Certified Associate in Project Management (CAPM)®

Project Management Institute

Issued On

Nov 2024

Dot

Professional Scrum Master™ I (PSM I)

Scrum.org

Issued On

Oct 2023

Top Blog Posts
Use Plugin in Flutter

Flutter provides us the opportunity to create beautiful mobile applications If we want to invoke any functionality of the device we need to add a plugin of it. We will learn by adding Shared Preferences plugin in our application.


Create an application and name it "shared_preferences_demo" then add the following code in its lib/main.dart file


import 'package:flutter/material.dart';

void main() => runApp(SharedPreferencesDemo());

class SharedPreferencesDemo extends StatelessWidget {
  @override
  Widget build(BuildContext context) {
    return MaterialApp(
      title: 'Shared Preferences Demo',
      home: HomePage(title: 'Shared Preferences Demo'),
    );
  }
}

class HomePage extends StatefulWidget {
  HomePage({Key key, this.title}) : super(key: key);

  final String title;

  @override
  _HomePageState createState() => _HomePageState();
}

class _HomePageState extends State<HomePage> {
  TextEditingController textController = new TextEditingController();
  String savedData = "";

  @override
  Widget build(BuildContext context) {
    return Scaffold(
        appBar: AppBar(
          title: Text(widget.title),
        ),
        body: Column(
          children: <Widget>[
            TextField(
              controller: textController,
            ),
            FlatButton(
              child: Text("Save In Shared Preferences"),
              onPressed: () {
                saveInSharedPreferences();
              },
              color: Colors.redAccent,
            ),
            Padding(
              padding: EdgeInsets.all(10),
            ),
            Text(savedData),
            FlatButton(
              child: Text("Get from Shared Preferences"),
              onPressed: () {
                getFromSharedPreferences();
              },
              color: Colors.greenAccent,
            ),
          ],
        ));
  }

  void saveInSharedPreferences() {
    debugPrint('save pressed');
  }

  void getFromSharedPreferences() {
    debugPrint('get pressed');
  }
}


Finding a plugin:


1. There are various flutter plugins available on the https://pub.dartlang.org/flutter, One can search and find a plugin there easily.

2. Search for shared preferences.

3. Select shared_preferences option.

4. Open Installing tab - Here you will learn how to integrate this plugin in your application.


Integrating Plugin in Our Application

1. Open pubspec.yaml file of your project

2. Add the following in your dependencies.


dependencies:
  shared_preferences:


3. Install it via command


flutter packages get


4. Import in your code as the following


import 'package:shared_preferences/shared_preferences.dart';


Add the following code in your lib/main.dart file.
1. Add this in saveInSharedPreferences method


void saveInSharedPreferences() async {
    String dataToSave = textController.text;
    SharedPreferences prefs = await SharedPreferences.getInstance();
    await prefs.setString('data', dataToSave);
    textController.text = '';
  }


2. Add this in getFromSharedPreferences method


void getFromSharedPreferences() async {
    SharedPreferences prefs = await SharedPreferences.getInstance();
    savedData = await prefs.getString('data');
    debugPrint(savedData);
  }


Run the app.
Now you will be able to save and get from shared preferences in your application.


Hope you enjoyed my post


References:
1. https://pub.dartlang.org/
2. https://github.com/flutter/plugins


How To Create Your Own Marker For AR Js

Here we will discuss how to create your own marker for AR js, As you know AR js is a javascript library use for creating an application with the capability of Augment Reality. But it relies on marker meaning we have to define a pattern on which we want to Augment the things, By default, this library use HIRO marker and there are several other inbuilt markers like kanji, but if you want to use your own pattern you can follow the below steps:


Following are the requirement for creating your own marker for AR js


1. AR.js (https://github.com/jeromeetienne/AR.js)
2. marker-generator (https://jeromeetienne.github.io/AR.js/three.js/examples/marker-training/examples/generator.html)
3. Image of marker preferably square and in black and white colors, In this example, have used the image as shown below.


p image

To generate your own marker


1. Go to the marker generator website.
2. Upload marker there.
3. click on Downoad Marker and Download Image, save both things in a location.
4. Our generated Marker image is as shown below and you can use my marker from here.

marker image

Use generated marker in our AR js application

1. Upload marker to a location on web and copy its path.
2. To use marker in AR js application you have to define the following line.


<a-marker preset="pattern" type="pattern" url="[web location of generated pattern]">


3. Your code will looks something like as shown below


<html>
<script src="aframe.min.js"></script>
<script src="AR.js/aframe/build/aframe-ar.js"> </script>
<a-scene >
    <a-sky color="#87cefa">
        <a-animation attribute="color" dur="10000" from="#87cefa" to="#1e90ff" repeat="indefinite"></a-animation>
    </a-sky>
    <!-- Basic plane. -->
    <a-marker preset="pattern" type="pattern" url='https://s3.amazonaws.com/oodles-blogs/blog-images/495e139a-0a49-474f-ab3c-476cbcc9bbc8.null'>
        <a-plane color="#c2b280" height="5" width="5" rotation="-90 0 0"></a-plane>
        <a-torus color="green" radius="0.4" position="-1.5 0 -1" rotation="-90 0 0"></a-torus>
        <a-cylinder color="brown" height="2" radius="0.03" position="-1.5 0 0" rotation="-90 0 0"></a-cylinder>
        <a-torus color="green" radius="0.4" position="1.5 0 -1" rotation="-90 0 0"></a-torus>
        <a-cylinder color="brown" height="2" radius="0.03" position="1.5 0 0" rotation="-90 0 0"></a-cylinder>
        <a-text color="red" value="Pawanpreet Singh" width="5" position="-1.3 0 -2" rotation="-90 0 0"></a-text>
        <a-text color="blue" value="Oodles Technologies" width="5" position="-1.2 0 0" rotation="-90 0 0"></a-text>
    </a-marker>
    <a-entity camera></a-entity>
</a-scene>

</html>


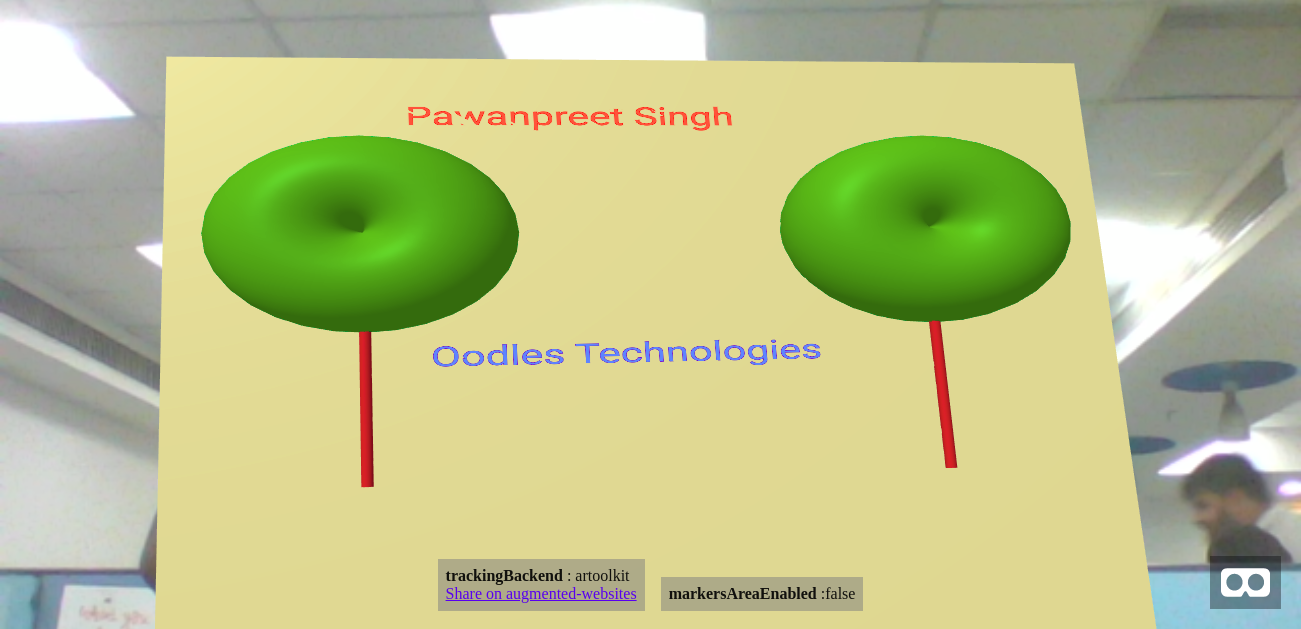
4. Code shown here will generate the following result if shown below marker.


output result


Hope you enjoyed my post.


Augument Reality With A Frame and AR Javascript Libraries

AFrame.js -  Using AFrame.js library one can build virtual reality applications in a markup language like html.

First we have created a scene using Aframe.js using following snippet


<html>
<script src="aframe.min.js"></script>
<a-scene>
    <a-plane color="#c2b280" height="10" width="10" rotation="-90 0 0"></a-plane>
    <a-torus color="green" radius="1.2" position="-4.5 3 -4.5"></a-torus>
    <a-cylinder color="brown" height="2" radius="0.05" position="-4.5 1 -4.5"></a-cylinder>
    <a-torus color="green" radius="1.2" position="4.5 3 -4.5"></a-torus>
    <a-cylinder color="brown" height="2" radius="0.05" position="4.5 1 -4.5"></a-cylinder>
    <a-text color="red" value="Pawanpreet Singh" width="5" position="-0.5 0 -4" rotation="-90 0 0"></a-text>
    <a-text color="blue" value="Oodles Technologies" width="5" position="-0.5 0 -3" rotation="-90 0 0"></a-text>
</a-scene>
</html>


Everything in the Aframe is written in the scene element.

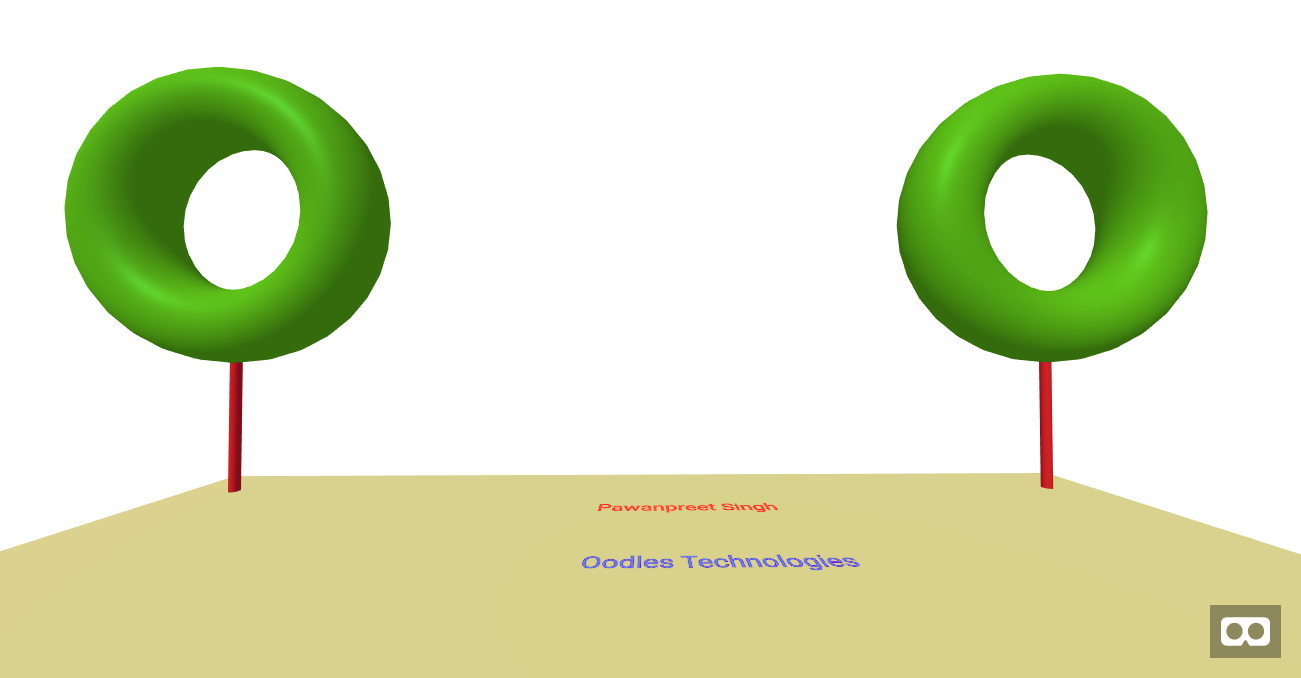
  • First I have created a plane and provided it a color #c2b280 for using it as floor.
  • Then I created circles using torus element and provided green color to it and assign its position in the scene.
  • Then to using circles as tree a have created its lower portion using cylinder element and provide brown color to it and then set its position.
  • For Writing text i have used text element and provided color and values to it.


AR.js - Using AR.js one can build Augment Reality applications in Javascript.
 
To use the above code written in Aframe library in Augment Reality I have used AR.js framework as shown below:


<html>
<script src="aframe.min.js"></script>
<script src="https://cdn.rawgit.com/jeromeetienne/AR.js/1.5.0/aframe/build/aframe-ar.js"> </script>
<a-scene >
    <a-marker preset="hiro">
        <a-plane color="#c2b280" height="5" width="5" rotation="-90 0 0"></a-plane>
        <a-torus color="green" radius="0.4" position="-1.5 0 -1" rotation="-90 0 0"></a-torus>
        <a-cylinder color="brown" height="2" radius="0.03" position="-1.5 0 0" rotation="-90 0 0"></a-cylinder>
        <a-torus color="green" radius="0.4" position="1.5 0 -1" rotation="-90 0 0"></a-torus>
        <a-cylinder color="brown" height="2" radius="0.03" position="1.5 0 0" rotation="-90 0 0"></a-cylinder>
        <a-text color="red" value="Pawanpreet Singh" width="5" position="-1.3 0 -2" rotation="-90 0 0"></a-text>
        <a-text color="blue" value="Oodles Technologies" width="5" position="-1.2 0 0" rotation="-90 0 0"></a-text>
    </a-marker>
    <a-entity camera></a-entity>
</a-scene>
</html>


In the above code we used aFrame-ar.js to use our aframe written code in Augment Reality applications.

First we told the application on which marker you have to react and set it to Hiro marker.

Hiro marker is as shown below


Then I changed height and positions of the object so that it can be shown in the marker.

Now when I run this application and shown the above marker to camera it augmented the marker as shown in the image below


Hope It helps you understand the basics of AR.js and Aframe.

Augment Reality a Brief Introduction with Javascript

Augment Reality??

It is a technology using which one can show information over the real world objects using devices such as mobile phones, tablets or AR glasses like Google Glass and Microsoft Hololens.


How Augment Reality differs from Virtual Reality??

In virtual reality, the user wears a device with a head-mounted display and experience a whole new world using that device. such devices shut the whole real world and provide a simulated environment to the user. but Augment Reality provide device provide experience over the real world where it adds computer-generated element over the real world object surrounding the user.


Frameworks/Libraries in javascript which can help to create AR applications??

There are various frameworks present in Javascript which can help one to create applications based on Augment Reality:

1. AR.js - It is an opensource, very fast web based AR framework, it tries to provide 60 FPS experience even on older mobile devices.

2. js-aruco - It is a port of arUco libraray, It is based on OpenCV.

From above two libabries AR.js has good community support, Using AR.js one can augment things in the real world very easily using simple markup like language, below is the basic code to create a simple project with AR.js.

<script src="https://cdnjs.cloudflare.com/ajax/libs/aframe/0.7.1/aframe.js"></script>
<script src="https://cdn.rawgit.com/jeromeetienne/AR.js/1.6.0/aframe/build/aframe-ar.js"></script>
<body style='margin : 0px; overflow: hidden;'>
	<a-scene embedded arjs='sourceType: webcam;'>
		<a-box position='0 0.5 0' material='opacity: 0.5;'></a-box>
		<a-marker-camera preset='hiro'></a-marker-camera>
	</a-scene>
</body>


When you execute the above code, It will ask you for camera permission then if you show the hiro marker to the camera which will create an object over it.


Hope now you understand the basics of Augument Reality using javascript.


Understanding Angular Universal and Creating Build

Angular uses HTML templates with javascript and parse it to the actual web page at the run time using a browser. Now using Angular Universal one can render Angular on a server. There are various reasons why one needs server-side rendering like Search Engine Optimization, Social Sites Content Embedding in sites like Twitter, Facebook, etc. With Angular 4.0 it ships along with packages of core angular titled platform-browser and platform-server.

Create basic angular application using @angular/cli

 
ng new my-new-app

cd my-new-app


Because we want our app to work on a server, we have to do some changes because now our application will have two starting points. Now we have to create two type-script files named browser.app.module and server.app.module in the same location as app.module.ts file.


browser.module

This module will call BrowserModule.withServerTransition which conveys the angular that view will be changed after the whole framework is loaded in the memory of the browser. Here we need to provide appId which is just a string.

 
import { AppModule } from './app.module';
import { BrowserModule } from '@angular/platform-browser';
import { NgModule } from '@angular/core';

import { AppComponent } from './app.component';

@NgModule({
    declarations: [],
    imports: [
        BrowserModule.withServerTransition({
            appId: 'your-app-id'
        }),
        AppModule
    ],
    providers: [],
    bootstrap: [AppComponent]
})
export class BrowserAppModule {}     
        

server.module


This module is not installed by default, we have to install it using the following command

 
yarn add @angular/platform-server

npm install @angular/platform-server --save


Let's add the following code to server module file

 
import { AppModule } from './app.module';
import { BrowserModule } from '@angular/platform-browser';
import { NgModule } from '@angular/core';
//Installed separatly
import { ServerModule } from '@angular/platform-server';

import { AppComponent } from './app.component';

@NgModule({
    declarations: [],
    imports: [
        //Make sure the string matches
        BrowserModule.withServerTransition({
            appId: 'my-app-id'
        }),
        ServerModule,
        AppModule
    ],
    providers: [],
    bootstrap: [AppComponent]
})
export class ServerAppModule {} 
        

Now we need the new entry point for server lets create a new file typescript server.main in the same location as main.ts file with following code.

 
export { ServerAppModule } from './app/server.app.module';
        

Now we need separate ts config file for a server so that while rendering at the server it can be used.


tsconfig.browser.json

 
 {
    "extends": "../tsconfig.json",
    "angularCompilerOptions": {
        "entryModule": "./app/server.app.module#ServerAppModule"
    },
    "exclude": []
}
{
    "extends": "../tsconfig.json",
    "angularCompilerOptions": {
        "entryModule": "./app/browser.app.module#BrowserAppModule"
    },
    "exclude": ["test.ts", "**/*.spec.ts"]
}
        

We are not done yet now we have to edit the angular-cli so that we can generate a new build for server deployment.

 
               "apps": [
        {
            "root": "src",
            "outDir": "dist",
            "assets": ["assets", "favicon.ico"],
            "index": "index.html",
            "main": "main.ts",
            "polyfills": "polyfills.ts",
            "test": "test.ts",
            "tsconfig": "tsconfig.browser.json",
            "testTsconfig": "tsconfig.spec.json",
            "prefix": "app",
            "styles": ["styles.css"],
            "scripts": [],
            "environmentSource": "environments/environment.ts",
            "environments": {
                "dev": "environments/environment.ts",
                "prod": "environments/environment.prod.ts"
            }
        },
        {
            "root": "src",
            "outDir": "dist-server",
            "assets": ["assets", "favicon.ico"],
            "index": "index.html",
            "main": "server.main.ts",
            "platform": "server",
            "polyfills": "polyfills.ts",
            "test": "test.ts",
            "tsconfig": "tsconfig.server.json",
            "testTsconfig": "tsconfig.spec.json",
            "prefix": "app",
            "styles": ["styles.css"],
            "scripts": [],
            "environmentSource": "environments/environment.ts",
            "environments": {
                "dev": "environments/environment.ts",
                "prod": "environments/environment.prod.ts"
            }
        }
    ], 
        

Let's create the build with the following command

 
ng build --prod --app 1


Understating Web Workers Basics

As you know javascript is single threaded language, we cannot run multiple scripts in javascript at same time. Various situations occurs when developers need things to run simultaneously. To handle those situations developers do some hacks like setTimeout etc. But in HTML 5 we have been provided with certain API’s to handle such scenarios which are known as Webworkers.

Basic Methods

  1. Creating object - Web worker execute in an environment which is isolated from other code. Thats why it needs a separate file to craete an object for the worker. Below is the example of contructor that has the name of file as input paramenter.
                    var myWorker = new Worker(‘heavyLoop.js’);
            
  2. postMessage - After the worker is created execute it using this method as shown below.
                    myWorker.postMessage();
            
  3. onmessage - This event captures the message sent by post message method we have to implement this in the main html file where we have constructed the worker. We get data in the event of this method, its implementation is as shown below.

    myWorker.onmessage = function(e){
    	alert(“Executed ” + e.data + “”);
    };


Basic Code Example:

welcome.html

<!DOCTYPE HTML>
<html>
<title>Heavy Loop</title>
	<script>
		var myWorker = new Worker(‘heavyLoop.js’);
		myWorker.onmessage = function(e){
	alert(“Executed ” + e.data + “”);
};

function welcomeMessage() {
	alert(“Welcome Man...”);
}

	</script>
	<body>
		<input type=”button” onclick=”welcomeMessage();” value=”Welcome Message”/>
	</body>
</html>


Below code will be the content of heavyLoop.js file.

var iterations = 600000000;
var times = 0;
for(var a = 0; a
    

Now we have to keep welcome.html and heavyLoop.js in same place in server.

Happy Coding.

Different Storage Options In HTML5

Objective:-

  • Learn various types of storage options in client side.
  • Which one to use at a certain occasion.

Types:-

  1. Web Storage - localStorage and sessionStorage
  2. Web SQL
  3. IndexedDB

WebStorageWeb apps using web storage can save data in the local memory of person browser.

Before this data was stored in cookies. Web storage can store a large amount of application data and it's more secure than cookies. Web Storge save data based on origin, all web pages can access same data if their origin is same as (origin = www.xyz.com).


localStorage - store data in browsers memory without any expiry.

sessionStorage - store data in browsers memory for a particular session.


                 // Save
localStorage.setItem("name", "Pawanpreet");
// Get
document.getElementById("output").innerHTML = localStorage.getItem("name");


Web SQL - It is a web API for saving data in DB which can be accessed using SQL. Because one can access use it using SQL statements it is known as WebSql.

Main methods of webSql are as below

  • openDatabase - this function will use an existing database or create the new one if not found.
  • transaction - this function provides the power to control the transaction either complete it or roll back the transaction.
  • executeSql - this function is used to run SQL queries.

IndexedDB - IndexedDB unlike WebSql does not save data in fixed columns but save data in the js based object-oriented database object. Using this one can save and access data using “key”. Like WebSql indexDB also work on the same origin.

Features:

  • Store data in a Key-Value form.

  • Based on Transactional DB model.

  • Most of API’s are asynchronous.

  • Uses event based on DOM to notify availability of result.

  • It is Object Oriented.

  • Does not use SQL statements.

  • Use same origin Policy.

 
Creating A Directive in Angular 4

Objective:

  • Learn the basics of @Directive decorator
  • Learn how to use your directive with elements using attribute.

Learning Decorator:

We will use ppNoZero name for our directive and will attach it to code like shown below:
 
                <input type=”number” ppNoZero />

        
The team at Angular recommends that we should use some prefix in our directive, here we have used 'pp' as a prefix.
 
Code:
                import {
   Directive, HostListener, Input
 } from '@angular/core';
 import {
   DefaultValueAccessor, NG_VALUE_ACCESSOR
 } from '@angular/forms';
  @Directive( {
   selector : 'input[ppNoZero], textarea[ppNoZero]',
   providers: [
     { provide: NG_VALUE_ACCESSOR, useExisting: NoZeroDirective, multi: true }
   ],
  } )
 export class NoZeroDirective extends DefaultValueAccessor {
    // set a new value to the field and model.
   private set value( val: any ) {
      // update element
     this.writeValue( val );
      // update model
     this.onChange( val );
    }
 
    /**
    * Updates the value on the input event.
    */
   @HostListener( 'input', ['$event.type', '$event.target.value'] )
   onInput( event: string, value: string ): void {
     this.updateValue( event, value );
   }
    /**
    * restrict zero on an input value.
    *
    * @param {string} value - input value
    * @param {string} event - input event
    */
   private updateValue( event: string, value: string ): void {
      //restricts zero on an input value
     this.value =  value.replace(/^0/g, '');;
    }
  }


We have created a directive using @Directive annotation decorator in our angular class.
Here we said it will be used on two selectors input and text area which has our directive in it.
 
Our directive will work only on input events if user inputs zero in initial place it will restrict it and replace it with the empty string using the updateValue method.
 
To use this directive we have to associate with an element in the HTML as shown below.
                <input type=”number” ppNoZero />


Now include this directive in your module to import its functionality into your project.
 
Happy Coding.
 
Dealing with major rejection reasons while submitting iOS apps

Apps submitted for Apple App Store undergoes a review process which usually take place after 3-4 days for free apps and then its status changes to in Review. There are several reasons for which your app might be get rejected, Please be prepared for stated issues before submitting your apps to Apple App Store. 


Common Issues:

1) More Information needed 

2) Guideline 2.2: Apps that exhibit bugs will be rejected 

3) Guideline 10.6: Apple and our customers place a high value on simple, refined, creative, well thought through interfaces. They take more work but are worth it. Apple sets a high bar. If your user interface is complex or less than very good, it may be rejected 

4) Guideline 22.2: Apps that contain false, fraudulent or misleading representations or use names or icons similar to other Apps will be rejected 

5) Guideline 3.3: Apps with names, descriptions, screenshots, or previews not relevant to the content and functionality of the App will be rejected 

6) Guideline 17.2: Apps that require users to share personal information, such as email address and date of birth, in order to function will be rejected 

7) Guideline 3.1: Apps or metadata that mentions the name of any other mobile platform will be rejected 

8) Guideline 3.8: Developers are responsible for assigning appropriate ratings to their Apps. Inappropriate ratings may be changed/deleted by Apple 

9) Guideline 3.4: App names in iTunes Connect and as displayed on a device should be similar, so as not to cause confusion 

10) Guideline 2.16: Multitasking Apps may only use background services for their intended purposes: VoIP, audio playback, location, task completion, local notifications, etc. 


What to do while submitting the app:

So before submitting the app please do refer to the upstated issues if your app is violating any one then you have to deal with some points given below:

1) You must provide full information to visit and check each fucntionality of your app, you must provide them user credentials if your app has any to check whole functionality.

2) Remove the crashes of bugs related to flow of your app.

3) Flow of your app must be simple for a new user to understand.

4) If you are only using facebook or google as your login process then you have to use other feature of them without this apple can reject your app.

5) Please do not provide false information for your apps functionality which you not have yet activated in the version submitted for review all the functionality described must be working.

6) Do not use apps name or icon similar to other app, try to be unique.

7) Try to add your own signup system rather than depending on third party services.

8) Try to appropriately rate your app, if its is not suitable for youngster and you have selected 3+ rating then your app might got rejected.

9) Do not use other platforms name(Android especially) in your apps metadata.

10) Yous app name in iTunes connect and in users mobile must be same.


If you try to check these upsated points while submitting your app then your app is less prone to get rejected.

THANKS

Cocoapods Requirement Installation and Usage with Swift

Requirement and Why to use it:

While developing projects we need third Party libraries, whenever we have to add new library we copy its code to our Project, while upgrading our Project to meet latest xCode requirements sometimes we need latest version of those libararies which we have added to our projects and in one project we might be using several third party libraries which we have to update, to manage all thsese headaches  developers use dependency managers like CocoaPods. 


Life without dependency manager:

1) Upgrading a library to a latest version can be difficult, especially if various libraries must be updated together because one can depend on another.

2) Including a library in your project makes it tempting to make local changes to the code, making it harder to update to a newer version later.

3) Determining the current version if the librabry used in your project can be a tough job especially if you are now tracking your changes.

4) Finding new libraries can be difficult without a central location to see all the available libraries.


Installation:

Open Terminal and enter the following command:

sudo gem install cocoapods

Enter your password when requested. You must use sudo to install CocoaPods, but you won’t need to use sudo after it’s installed.

Lastly, enter this command in Terminal to complete the setup:

pod setup --verbose

This process will likely take a few minutes as it clones the CocoaPods Master Specs repository into ~/.cocoapods/ on your computer.

The verbose option logs progress as the process runs, allowing you to watch the process instead of seeing a seemingly “frozen” screen.


Usage:

You first need to close Xcode.

Open Terminal and navigate to the directory that contains your IceCreamShop project by using the cd command:

cd ~/Path/To/Folder/Containing/Project

Next, enter this command:

pod init

This creates a Podfile for your project.

Type this command to open the Podfile using Xcode for editing:

open -a Xcode Podfile

The default Podfile looks like this:

# Uncomment this line to define a global platform for your project

# platform :ios, ‘8.0’

target ‘Project’ do

end

target ‘ProjectTests' do

end


Replace the two commented lines with the following:

platform :ios, "8.0"

use_frameworks!

This tells CocoaPods that your project is targeting iOS 8.0 and will be using frameworks instead of static libraries.

Now add dependency using CocoaPods. Save and Close the Podfile

You now need to tell CocoaPods to install the dependencies for your project. Enter the following command in Terminal:

pod install


This is all you need to do!


ECMA6 script features Part 1

ECMA 6 is upcoming new version of javascript, It has a huge amount of changes on the top of previous version ECMA 5 .There are various major changes like adding new types or syntax, To sustain in future one must gain basic knowledge of upcoming version of JavaScript. Lets start with some new upcoming string functions


String functions


  • includes() - it return boolean value, returns true if the inputted text is present any where in the whole string, else return false.
  • startsWith() - It is just like includes but instead of searching whole string, it only matches whether the inputted text matches with the initial characters of the given string.
  • endsWith() - Same as above except it matches the text in the string at the end instead with the starting.
 var msg = "Oodles Technologies";

 console.log(msg.startsWith("Oodles"));       // true
 console.log(msg.endsWith("!"));             // false
 console.log(msg.includes("s T"));             // true


  • repeat() - this function takes one argument which determine how many it has to repeat the string.


 console.log("test".repeat(3));       // "testtesttest"
 

THANKS

Make Android Production build in new Appcelerator Studio

As you know that Appcelerator is closing its Titanium Studio and has launched a new Appcelerator Studio in its place, so now everyone have to use this new studio to make Titanium mobile apps.


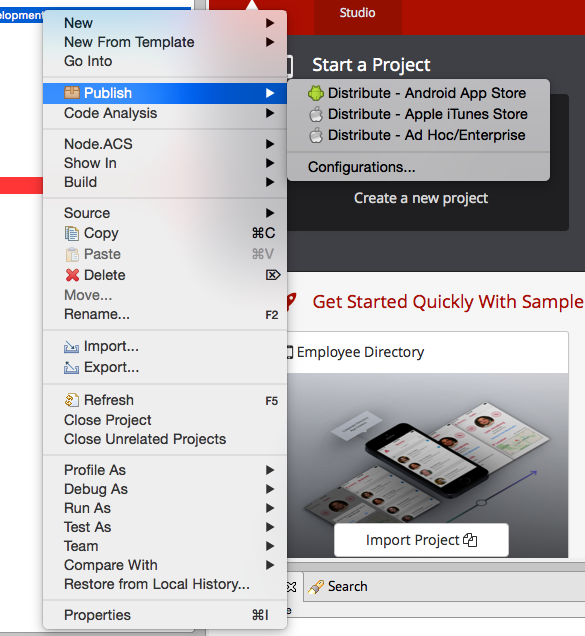
It seems like there is an issue with this new Appcelerator Studio when you try to make the Android production build ready to submit in the Google Play Store using the “Publish -> Distribute Android App Store” option which appears when user right clicks the app.


However, you can still make the Android Production build with Appcelerator Studio using the CLI (Command Line Interface).


For this, open your CLI and in that go till the path where your project is placed.


Then, write the following command in your CLI - 


 appc run -p android -T dist-playstore [-K <keystore_file> -P <keystore_password> -L <keystore_alias> -O <output_directory>]


<KEYSTORE_FILE> is the path of the android keystonein your system.

<KEYSTORE PASSWORD> is the password that you set for your android keystore.

<KEYSTORE_ALIAS> is the alias for your android keystore that you set.

<OUTPUT_DIRECTORY> is your output directory where your project apk will be formed.


This is all that you need to do for making the Android production build ready for submission.


Custom objects in ArrowDB

Custom obejcts in ArrowDB are required when you want to save a thing which is not present in built in restful calls creted by Appcelerator. To overcome this situation one can create its own custom object to save that data. One can easily integrate these custom objects with the existing ArrowDB objects. Here I will give brief overview how can one use it in his/her app.

Create a custom object

 Cloud.Objects.create({
    classname: 'students',
    fields: {
        name: 'Pawanpreet',
        stream: 'medical',
        rollno: 5
    }
}, function (e) {
    if (e.success) {
        var student = e.students[0];
        alert('Success:\n' +
            'name: ' + student.name + '\n' +
            'stream: ' + student.stream + '\n' +
            'rollno: ' + student.rollno + '\n' +
            'created_at: ' + student.created_at);
    } else {
        alert('Error:\n' +
            ((e.error && e.message) || JSON.stringify(e)));
    }
});


The above code will create a new custom object named students, Custom object name will be the name of the classname which we have provided while creating a new object. Here we have added fields named - name, stream and rollno in it with its respective values.


Now its time to get the saved custom object for use in our app.

Getting the value of custom object

 Cloud.Objects.show({
    classname: 'students',
    ids: [ studentsIdReturnedFromServerAfterSaving ]
}, function (e) {
    if (e.success) {
        alert('Success:\n' +
            var car = e.students[0];
            alert('id: ' + students.name + '\n' +
                'rollno: ' + students.rollno + '\n' +
                'stream: ' + students.stream 
        }
    } else {
        alert('Error:\n' +
            ((e.error && e.message) || JSON.stringify(e)));
    }
});
 
Handling Images with ArrowDB in Titanium app

There are various times when we need to save a Photo in database, ArrowDB also provides us same to save the users uploaded image to server and if user needs it user can get the link of s3 which he/she can use in its app.

Here I will show you how to get from device and save it in ArrowDB

Getting Image from device


var mediaParams = {
	success : handlePhoto,
	cancel : function() {
     //do nothing
	},
	error : function(error) {
		 alert(error);
	},
	mediaTypes : Ti.Media.MEDIA_TYPE_PHOTO
};
 
Titanium.Media.openPhotoGallery(mediaParams);

function handlePhoto(e){
  var file = Titanium.Filesystem.getFile(e.media.nativePath);
  sendPhoto(file);
}
 

Here we are selecting an image from gallery and opening then sending the selected image to sendPhoto which will send this selected image to the server and is shown below, but before using this user must be logged in before calling the photo api.

Saving Photo


function sendFile(file){
Cloud.Photos.create({
    photo: Titanium.Filesystem.getFile('photo.jpg')
}, function (e) {
    if (e.success) {
        var photo = e.photos[0];
        alert('Success:\n' +
            'id: ' + photo.id + '\n' +
            'filename: ' + photo.filename + '\n' +
            'size: ' + photo.size,
            'updated_at: ' + photo.updated_at);
    } else {
        alert('Error:\n' +
            ((e.error && e.message) || JSON.stringify(e)));
    }
});
}
 

Now the photo is stored ArrowDB, Its time to fetch for use in app

Fetching Photo

 Cloud.Photos.show({
    photo_id: PhotoIdWhichWasReturnedWhileSaving
}, function (e) {
    if (e.success) {
        var photo = e.photos[0];
        alert('Success:\n' +
            'url: ' + photo.url + '\n'
    } else {
        alert('Error:\n' +
            ((e.error && e.message) || JSON.stringify(e)));
    }
});


You can use this image url in your app to show this image.

THANKS


ArrowDB Introduction and Basics

ArrowDB was a part of Appcelerator Cloud, now it is just known as ArrowDB. It provides us a set of RESTful API object which help us to manage backend of our application is very easy manner. There are various builtin objects which are provided by it like Users, Photos, Data Files, Key-Values, Chats, Checkins, Posts,...etc. If one does not find any of the built in object which suits your application needs one can create his/het own Custom Objects which suits its application needs.

Here I will show you an basic use of it in your application for user login. using its builtin Users object restful api.

Before using it your application must be enabled to use Platform services. To enable it for your app while creating you must select Enable Appcelerator Platform Services checkbox. If you have an existing app and you want to use Platform services in it you must open tiapp.xml and then click the Enable Services button in it.

 // app/controllers/index.js
var Cloud = require("ti.cloud");

function createUser(usernameFilledByUser,passwordFilledByUser) {
    Cloud.Users.create({
        username : usernameFilledByUser,
        password : passwordFilledByUser;,
        password_confirmation : passwordFilledByUser;
    }, function(e) {
        if (e.success) {
            alert(e.users[0].username + " is created successfully.");
        } else {
            alert("Error: " + e.message);
        }
    });
}


Above shown code will create a new user in ArrowDB which we can use now for our login purpose.


function loginUser(usernameFilledByUser,passwordFilledByUser) {

	Cloud.Users.login({
		login : usernameFilledByUser,
		password : passwordFilledByUser,
	}, function(e) {
		if (e.success) {
            alert(e.users[0].username + " is logged in.");
        } else {
            alert("Error: " + e.message);
        }
	});
};


The above code will verify the user in ArroDB database


Basics of Node acs platform

Node.acs platform.

On reading this,"What is node.acs platform!!!" question must be arises in several people mind. Just for them...

node.acs - this is a platform where one can use the whole power of node.js and with some appcelerator services and can publish it in cloud(hosted by appcelerator). The project which is generated by node.acs is full MVC in structure.

Let'z start with Installation node.acs

check your node version

In terminal app write the following command

node -v

It will show the current version of node version installed in your machine.

Install acs

Type following in your terminal app

sudo npm install -g acs

It will install cli based utility to create and manage node.acs applications

Let'z create our first app

You have to login first

Write the following in terminal to login

acs login

Generate first app

acs new myApp

It will generate a new node.acs application in myApp folder, Now move into that directory and execute the following command

acs publish

It will publish your app to appcelerator cloud platform, which returns an URL which you can open in your favourite web browser to access.

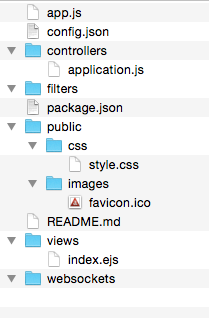
Understanding project structure

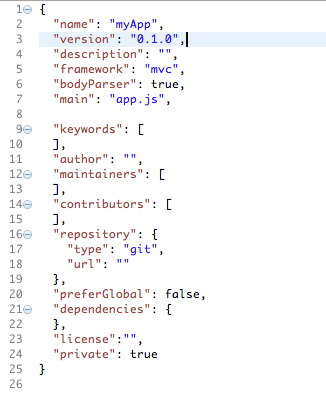
  1. app.js - Default main execution script file, this will be the file which will be executed first. One can change this to any other by altering in package.json "main" key
  2. config.json - This file handles the routing, filtering and websocket functionality for your app.
  3. controller (Directory) and application.js - config.json handles this directory through routing.

    code - { "path": "/", "callback": "application#index" }

    Like this defines whenever user opens the root then node.acs will executes the index function written in application.js file present in controllers directory
  4. filters (directory) - config.json handles this directory for filteration purpose, same as controllers which handles routing for config.json.
  5. package.json - This is the configuration file, few of them are like name, version, dependencies, license, etc. as shown in figure below.
  6. public (Directory), images(Directory), css (Directory) - public is the directory where one can place static files for his application. images and css are the directories under public which is used to separate the images and css for application.
  7. views - view are handled handled through this directory, files inside this directory have ejs extension

Please refer to my other post to know the usage of node.acs while learing how to automate push notification using this technology.

Titanium Cli Plugins Basics

Titanium Cli Plugin

Titanium Cli Plugins provides a way to create new commands for titanium or user can hook previously build commands with functions and events.

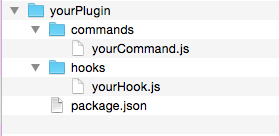
Structure:

User has to create Titanium cli plugin using the above shown structure, There are two folders namely commands and hooks. In above fig both contains js files to handle respective tasks and a file package.json which will be plugins configuration file and will contain configurations like name, version, dependencies, etc.


Usage

To Make these commands/hooks available globally user has to bind locally with titanium, One can do this typing following commands in terminal.


ti config -a paths.commands /*Your current plugin commands folder path*/ 
ti config -a paths.hooks /*Your current plugin hooks folder path*/


Thanks

Automate Push notification with Node acs

For basic infomation on node acs please refer to my other post.

Here we will learn how to automate the process of sending push notification from server to your devices, For this we will use node.acs and appcelerator push notification services. As you know the structure of the Node.acs project as discussed in my previous post. Here we will implement the functionality.


Working

What we are going to do is check a webservice which we are assuming will return timestamp when of last change, we are saving this timestamp in persistent storage andserver will continuously hit the webservice to check whether there is any difference between the last change timestamp, If there iis a difference in the timestamp then it will call the function which sends a push notification request to the appcelerator cloud push notification service with the detail of the channel whom to which we want to send push notification. Then cloud server will send a push notification to the device. Your device must be registered for the channel to whom the push notification we are sending for testing purpose.

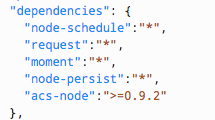
Add the following dependencies in package.json file as shown in figure below:

  • node-schedule - we are using this to use cron service for our app so that we can automate our process.
  • request - we are using this to make a request to a webservice.
  • moment - we are using this to handle various types of date/time object.
  • node-persist - we are using this to save our data locally in persistent manner.


Open application.js under controllers directory and replace the contents with the following

 function index(req, res) {
	res.render('index', {
		title : 'Our Test Automation App to send Push Notification'
	});
}

var schedule = require('node-schedule');
var request = require('request');
var moment = require('moment');
var storage = require('node-persist');
var ACS = require('acs-node');
var sdk = ACS.init('xxxxxxxxxxxxxxxxxxx');//add this with production/development app key of acs push notification cloud services
var then = "2013-12-11T16:12:21.636Z";

storage.initSync();
storage.setItem('then', then);

schedule.scheduleJob('*/10 * * * *', function() {
	request('http://mywebsiteurl/newsFeedLastUpdate.json', function(error, response, body) {
		if (!error && response.statusCode == 200) {
			var json = JSON.parse(body);
			var now = json.lastUpdated;
			var diff = moment(now).diff(storage.getItem('then'), "m");
			
			if (diff > 0) {
				console.log("difference in timestamp: " + diff);
				storage.setItem('then', now);

				var data = {
					login : "credential of the user you created for this app in acs panel", // App Admin User credentials
					password : "Its password"
				};

				sdk.rest('users/login.json', 'POST', data, function(data) {
					if (data && data.meta) {
						if (data.meta.status == 'ok') {
							console.log("Successful to login.");
							sendPushNotification(data.meta.session_id);
						} else {
							console.log("Error to login: " + data.meta.message);
						}
					} else {
						console.log("Error to login, try again later.");
					}
				});
			} else {
				console.log("No difference found in timestamp, nothing sent with push notification.");
			}
		}
	});
});


function sendPushNotification(session_id) {
	var data = {
		"_session_id":session_id,
		"to_ids":"everyone",
		"channel" : "mychannel",
		"payload" : {
			"alert" : "There are new articles in the Countdown Library"
		}
	};
	
	sdk.rest("push_notification/notify.json", 'POST', data, function(data) {
		if (data && data.meta) {
			if (data.meta.status == 'ok') {
				console.log(JSON.stringify(data.response.push_notification));
			}else{
				console.log("Error in sending push notification: " + data.meta.message);
			}
		} else {
			console.log("Error to login, try again later.");
		}
	});
}


You must add the cloud api key in the SDK in the above code and must create a user for app which will send request to your acs push notification service, you have to enter his detail in the login/password written in the above code

You have to create a webservice which will return the last update timestamp

For more information on client side setup of appcelerator push notification please refer to this link and for server side setup please refer to this link.

Using Appcelerator Cloud Serives Push Notification Part II

Welcome back...You must be ready with the things which I mentioned in my previous post, Let us recheck them

  • you must created a iOS development certificate.
  • Apple Id with push notification enabled. (must be same as your appId)
  • Apple Push Notification certificate.

For client side code please refer to my previous post

Steps to generate of p12 file required to send push notification from acs server

  1. Double click and install the Apple Push Notification certificate which you generated through Apple developer portal, it will add it to the keychain.
  2. Open Keychain access (you can do this by hitting spacebar while holding command it will open search area on the screen and here you have to type keychain…. , while typing this it will show you example of keychain access just hit enter).
  3. In Keychain access select certificates from the left menu and in the main area right click your recently added certificate and export it as p12 file(save this in a safe place ….. bcoz we need this).

Let'z do Server Side Thingz

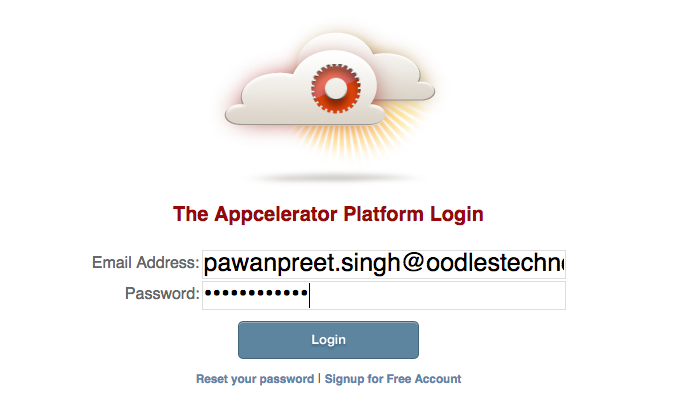
  1. Login at Appcelerator Platform Portal
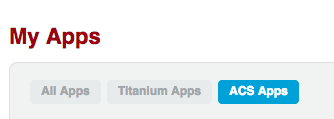
  2. Select acs apps and find your app name then click on manage acs as shown in the figures below:
  3. make sure development is selected and then move in the settings tab and add your p12 file here, and enter its password you entered while exporting this to p12

Let'z Send a Notification

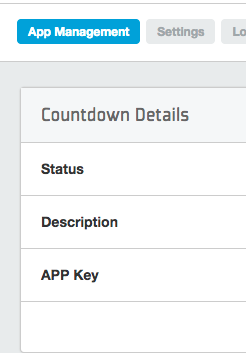
  1. Add your acs app key in your mobile app, you can find this key in the location as shown in figure below
  2. Open your app, It will register your current device with acs push notification
  3. you must be sure development tab is selected
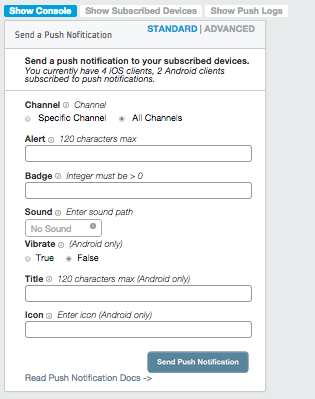
  4. Select Push Notifications tab
  5. enter some text in Alert Text field and press the send push notification button.

This will popup a push notification on your mobile device, Thats all folks.

THANKS

Using Appcelerator Cloud Serives Push Notification Part I

I will show you how to you can implement push notification services provided by appcelerator cloup services. Here we will try to send notification to an iOS device which is subscribed to a channel. Before starting you must check that you have TitaniumStudio with latest SDK installed.

Lets get started:-


Handling Client Side

  1. Open TitaniumStudio -> New -> Mobile App Project

    New Dialog will appear, Here don't change Alloy from the side menu then select “Default Alloy Project” and click next

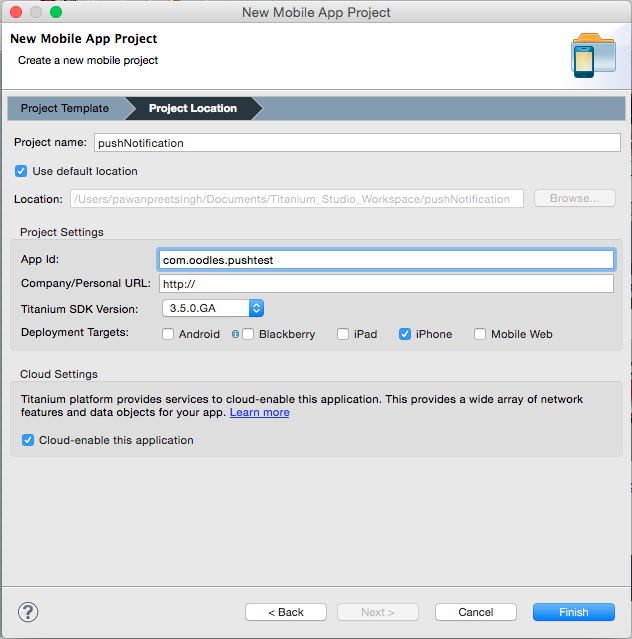
    Enter Project name, App Id and just select iPhone in deployment targets and you must select the “cloud-enable this application” checkbox. As shown in the figure below:

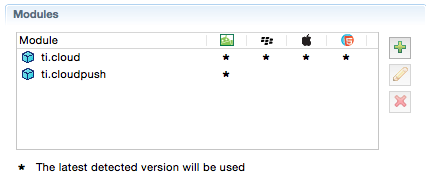
  2. add ti.cloud and ti.cloudpush to your project in modules as shown in the following figure
  3. add the following code in acsPush.js under lib folder.
    var Cloud = require("ti.cloud");
    var osname = Ti.Platform.osname;
    var channel = "";
    
    var receivePush = function(e) {
    	Ti.API.info('got pushCallback');
    	Ti.API.debug(JSON.stringify(e));
    	if (osname != "android") {
    		// Do Something here?
    		alert("Notification received: " + JSON.stringify(e));
    	} else {
    		//var extras = e.extras;
    		setTimeout(function() {
    			// Do Something here?
    			alert("Notification received: " + JSON.stringify(e));
    		}, 750);
    	}
    };
    
    function deviceTokenError(e) {
    	Ti.API.error('Failed to register for push notifications! ' + e.error);
    }
    
    function deviceTokenSuccess(e) {
    	Ti.API.debug('got retrieveDeviceToken success');
    	Ti.API.debug('e=' + JSON.stringify(e));
    	Ti.API.debug('channel=' + channel);
    	subscribeToChannel(e.deviceToken);
    }
    
    function subscribeToChannel(token) {
    	Cloud.PushNotifications.subscribeToken({
    		device_token : token,
    		channel : channel,
    		type : Ti.Platform.name == 'android' ? 'android' : 'ios'
    	}, function(e) {
    		if (e.success) {
    			Ti.API.info('subscribed');
    			Ti.App.fireEvent('push:register', {
    				token : token
    			});
    
    		} else {
    			Ti.API.error('Error:\n' + ((e.error && e.message) || JSON.stringify(e)));
    		}
    	});
    }
    
    if (osname != "android") {
    
    	exports.registerForPush = function(username) {
    		channel = username;
    
    		Ti.API.info('registering for PUSH');
    		Ti.API.info('platform=' + Ti.Platform.version.split(".")[0]);
    
    		// Check if the device is running iOS 8 or later
    		if (parseInt(Ti.Platform.version.split(".")[0]) >= 8) {
    			function registerForPush() {
    				Ti.Network.registerForPushNotifications({
    					success : deviceTokenSuccess,
    					error : deviceTokenError,
    					callback : receivePush
    				});
    				// Remove event listener once registered for push notifications
    				Ti.App.iOS.removeEventListener('usernotificationsettings', registerForPush);
    			};
    
    			// Wait for user settings to be registered before registering for push notifications
    			Ti.App.iOS.addEventListener('usernotificationsettings', registerForPush);
    
    			// Register notification types to use
    			Ti.App.iOS.registerUserNotificationSettings({
    				types : [Ti.App.iOS.USER_NOTIFICATION_TYPE_ALERT, Ti.App.iOS.USER_NOTIFICATION_TYPE_SOUND, Ti.App.iOS.USER_NOTIFICATION_TYPE_BADGE]
    			});
    
    		} else {
    			// For iOS 7 and earlier
    			Ti.Network.registerForPushNotifications({
    				// Specifies which notifications to receive
    				types : [Ti.Network.NOTIFICATION_TYPE_BADGE, Ti.Network.NOTIFICATION_TYPE_ALERT, Ti.Network.NOTIFICATION_TYPE_SOUND],
    				success : deviceTokenSuccess,
    				error : deviceTokenError,
    				callback : receivePush
    			});
    		}
    
    	};
    
    } else  {
    
    	var CloudPush = require('ti.cloudpush');
    
    	exports.registerForPush = function(username) {
    		channel = username;
    		Ti.API.info('registering for PUSH');
    		CloudPush.retrieveDeviceToken({
    			success : deviceTokenSuccess,
    			error : deviceTokenError
    		});
    		CloudPush.showTrayNotificationsWhenFocused = true;
    		CloudPush.addEventListener('callback', receivePush);
    
    	};
    
    }
    
    
  4. In index.js file under controller folder add the following code.
    var acs = require('/js/acsPush');
    	acs.registerForPush("library");

Before continuing you must have the following files ready


  • you must created a iOS development certificate.
  • Apple Id with push notification enabled. (must be same as your appId)
  • Apple Push Notification certificate.

Please refer to second part of this tutorial to know how to handle server side thingz...

How to check your app at different network speed OSX

There is a tool which measure the network stability of your app either iOS or Android in OSX, known as network link conditioner it helps developers to identify the behaviour of their apps in different network speeds, and this tool is being provided by Apple itself. You can download this tool from the steps given below:

  1. Open Apple's developers download website in your favorite brower in you mac.
  2. Now find Hardware IO Tools for Xcode which is suitable for your OS you can check this in description of download.
  3. Open the DMG file you recently downloaded. in this you will find various sotwares, here you have to select Network Link conditioner and install it.
  4. After installation you will be able to find the in prefrence of your OSX
  5. When you open it from prefrences it will be open as shown below.
  6. There are various inbuilt profiles like "3G", "Wifi", "DSL", "100% Loss", after selecting one of this you have to turn on the turn on from toggle button
  7. Now your whole OSX's network will behave as the selected profile.
  8. Now you can test your apps for network stability using simulator/emulator.


Thanks

Using SWRevealViewController in Swift

SWRevealViewController is a side view controller inspired by facebook menu style written in Objective-C. Here I will show you how can you use this in your swift based application. Please do the following:


  1. Download the SWRevealController from this github link.
  2. Make a new single view based application in Xcode, select swift as language.
  3. Drag one more View Controller and a Table View Controller to main storyboard.
  4. Drag SWRevealViewController.m file from the place where you have downloaded the SWRevealController (You can find this file inside SWRevealViewController folder), and Click “Yes” to the prompted message Would you like to configure an Objective-C bridging header?
  5. Drag SWRevealViewController.h in your project from same place.
  6. Select your Root View Controller from storyboard and from Identity Inspector change its class from ViewController to SWRevealViewController.
  7. Right click on Root View Controller and create a segue to Table View Controller select Reveal View set Controller from manual segue. repeat same for other View Controller.
  8. Select segue of Table View Controller and in Attributes Inspector add sw_rear as Identifier.
  9. Select segue of Other View Controller and in Attributes Inspector add sw_front as Identifier.
  10. In the generated briding file add the following code
      #import "SWRevealViewController.h"


What we have done till now:-

There are Three Controllers in main storyboard our root controller is of type SWRevealController which will handle our functionality. We created segue to identify SWRevealController which will show in front and which view will be as rear. Front view will be your main screen and rear view will be treated as menu.

  1. Create new cocoa touch class which will be subclass of UITableViewController, name it as MenuTableViewController and a cocoa touch class subclass of UIViewController and name it as MainViewController.
  2. Change the class of TableViewController to MenuTableViewController and other ViewController to MainViewController.
  3. Open MenuTableViewController.swift file and add this below import statement.
    struct Bird{
        var name:String!
    }
            
  4. Change the following methods of your class as shown below.
    override func viewDidLoad() {
            super.viewDidLoad()
            birds.append(Bird(name: "Pigeon"))
            birds.append(Bird(name: "Crow"))
            birds.append(Bird(name: "Peacock"))
            birds.append(Bird(name: "Duck"))
            birds.append(Bird(name: "Parrot"))
            birds.append(Bird(name: "Eagle"))
        }
    
        override func numberOfSectionsInTableView(tableView: UITableView) -> Int {
            return 1
        }
    
        override func tableView(tableView: UITableView, numberOfRowsInSection section: Int) -> Int {
            return birds.count
        }
    
        override func tableView(tableView: UITableView, cellForRowAtIndexPath indexPath: NSIndexPath) -> UITableViewCell {
            let cell = tableView.dequeueReusableCellWithIdentifier("myCell", forIndexPath: indexPath) as UITableViewCell
            cell.textLabel?.text = birds[indexPath.row].name
            // Configure the cell...
    
            return cell
        }
            
  5. Select cell in TableViewController from main storyboard and change its identifier using Attributes inspector to myCell.
  6. Make delegate, datasource of this TableViewController to self by right clicking on table and drag to yellow icon above table view controller and select delegate and datasource one by one.
  7. Add a button to other view controller which is now MainViewController on top left corner of this view and open MainViewController.swift as side by side using Assistant Editor and create an outlet named menuButton in swift file.
  8. Add the follwing code in viewDidLoad of MainViewController class.
    menuButton.addTarget(self.revealViewController(), action: "revealToggle:", forControlEvents: UIControlEvents.TouchUpInside) 
            
  9. Run and Test the app.


Using Objective C code in Swift

Swift is new language to develop applications for iOS devices. There are various times when you know how to do a thing in objective-c, but you don’t know in Swift how to implement the same. For those situations apple have created a way to bridge and use objective-c files (.m and .h) files in your Swift Project.

Here, I will explain how to do the above by creating a method in objective c code and then we will call it from our swift code.

  • Create a new Single View Application and select Swift as Language.
  • Select Main.storyboard from Project Navigator and add a button to the view as shown below.
  • Click on “Assistant Editor” to open storyboard view and ViewController.swift file simultaneously.
  • Now Right Click on the button in view Controller inside story board, drag to ViewController file and add an action named buttonClicked, to test it you can add a code snippet shown below to display “Hey...! its from Swift”
            @IBAction func button1(sender: AnyObject) {
            		println("Hey...! its from Swift")
        	}
            
  • Now it's time to create the objective-c files so we call call methods from it, Right Click in Project Navigator and select new file then from choose a template window select objective c file (with m icon), give it a name let we will give it a name “ObjCTestFile” and from the and Click Yes when it ask for “Would you like to configure an Objective-C bridging header?”
  • Repeat the above step to add header file, name the file similar to the m file we added earlier.
  • Add the following code in the generated bridging file
                 #import “ObjCTestFile.h”   
            
  • Add the following snippet to header(.h) and implementation (.m) file.
    1. ObjCTestFile.h
      #import <Foundation/Foundation.h>
      @interface ObjCTestFile: NSObject
      -(void) fromObjC;
      @end 
             
    2. ObjCTestFile.m
      #import "ObjTestFile.h"
      
      @implementation ObjTestFile
      -(void) fromObjC{
          NSLog(@"Hey...! its from Objective C");
      }
      @end  
              
  • Now add one more button in View Controller.
  • Make a IBAction for this button and call the objective-c code as shown below
        @IBAction func button2(sender: AnyObject) {
            var objCFileObj: ObjCTestFile = ObjCTestFile()
            objCFileObj.fromObjC()
        } 
            

Run the app and test. you will find output like shown below in console


First output came when I pressed button1 and the output in second line came when I pressed button2.

If you want to know about some basics on swift please refer to How to Create Hello World app in Swift iOS


Thanks

Preference plugin implementation in iOS

Preference plugin Implementation in iOS

Here I will show you how one can add his cordova application in device settings and can handle some events through it.

Plugin to use:

I used plugin named cordova ios application preference you can use the following link to check the plugin at Github

https://github.com/escio/cordova-ios-application-preferences

To add this plugin in your project follow the following procedure

  1. Download the zip file from the above link.
  2. Using terminal go in your project directory, from inside your cordova project you have to enter the following command
     cordova plugin add {path to downloaded plugin}
     
  3. Open your project in xcode.
  4. Go to File > New > File... then a new window will open select select resource in iOS then select Settings Bundle.

Now a new settings.bundle file will be added to your project

Visit this link for more detail about settings.bundle

Now I will show you how to use this plugin.

Change the value of “Group” to “Clear local data of app in next startup”


Remove “Name” and “none given” key/value pair.

Change the value of “Enabled” to “Clear”

  1. Select Root.plist file generated by adding settings.bundle in xcode.
  2. Under Preference Items remove the following Items

    Now you are left with Group, Toggle Switch.

    • Text Field
    • Slider
  3. In Root.strings file

Note the name “enabled_preference” is the Identifier of your Toggle switch in Root.plist file

Open your application js file

Add this method to check the value of the toggle switch

window.plugins.applicationPreferences.get('enabled_preference', function(result) {
        alert("Current Toggle State: " + result);
    }, function(error) {
        alert("There was some issue getting value: " + error);
    }
);

and the following method to set the value of toggle switch

window.plugins.applicationPreferences.set('enabled_preference',0, function() {
				    
				    }, function(error) {
				        console.log("Failed to retrieve a setting: " + error);
				});

We are setting the value 0 to turn the toggle to off(false) state


If you are storing any local data you can clear it using the value of Toggle Switch

You can set the default value of Toggle Switch to ‘NO’ in Root.plist file

If a user changes its value to Yes on next startup of the app You can check its value then clear the local data and then set the value back to No using the following code.

window.plugins.applicationPreferences.get('enabled_preference', function(result) {
       		if(parseInt(result) == 1){
       			localStorage.clear();
       			window.plugins.applicationPreferences.set('enabled_preference',0, function() {
				    
				    }, function(error) {
				        console.log("There was some error: " + error);
				});
iOS 7 Status Bar issue in Phonegap

While running PhoneGap app on iOS I found out that the status bar is creating issue because now my app was running in full screen and status bar is floating on the app.

To resolve this I have to make changes to the following files:

  1. MainViewController.m
  2. MainViewController.h
  3. javascript file $(window).on(‘load’) function

To solve this we have to add the following code in MainViewController.m file under viewwillApprear method to add the 20px margin from the top and to reduce the size of the app to reduce 20px

MainViewController.m

- (void)viewWillAppear:(BOOL)animated
{
if ([[[UIDevice currentDevice] systemVersion] floatValue] >= 7) {
    CGRect viewBounds = [self.webView bounds];
    viewBounds.origin.y = 20;
    viewBounds.size.height = viewBounds.size.height - 20;
    self.webView.frame = viewBounds;
}
[super viewWillAppear:animated];
}

Now this causes an issue that viewport is taking extra 20px which causes scroll in the content.So to resolvev this issue I have to add the following javascript in $(window).on(‘load’) function

Javascript/Jquery file

if (window.device && parseFloat(window.device.version) >= 7) {
   	     var windowHeight = $(window).height();
   		 document.querySelector('meta[name="viewport"]').content = "user-scalable=no, width=device-width, initial-scale=1, height=" + windowHeight;
   }

Now whenever I am using external plugin like camera,inApprowser then the viewWillAppear method is re-fired which causes the view to shrink by 20px more.Which is causing more trouble to resolve this we have to add the following in MainViewController.h and also modify our MainViewController.m file as shown below

MainViewController.h

@interface MainViewController : CDVViewController{

    BOOL isHideStatusBar;
}

MainViewController.m

- (void)viewWillAppear:(BOOL)animated
{
    if ([[[UIDevice currentDevice] systemVersion] floatValue] >= 7 && isHideStatusBar) {
        CGRect viewBounds = [self.webView bounds];
        viewBounds.origin.y = 20;
        viewBounds.size.height = viewBounds.size.height - 20;
        self.webView.frame = viewBounds;
        isHideStatusBar =NO;
    }
    
    self.view.backgroundColor =[UIColor colorWithRed:(133.0 / 255.0) green:(197.0 / 255.0) blue:(31.0 / 255.0) alpha: 1];
    [[UIApplication sharedApplication] setStatusBarStyle: UIStatusBarStyleBlackOpaque];
    [super viewWillAppear:animated];
}

- (void)viewDidLoad
{
    isHideStatusBar = YES;
    [super viewDidLoad];
    // Do any additional setup after loading the view from its nib.
}

Thats All Folks..!!!

Dynamically added class selection (click) issue

In one of my recent apps, I faced an issue which prevents to execute a Jquery function on a class which was added dynamically and was not present in the DOM when the page was created.

In the following blog I will show you what problems I faced and what I have done to overcome this issue.

In this demo project I have used topcoat(Topcoat Mobile Light) for designing you can download this from Topcoat's Website.

So Lets starts our journey…:)

Static class="card" in list-item works as charm:

Here I will show you how a class="card" added static in html code is working fine. Now when I tried to select any list item jquery is able to fire the on('click') event of jquery and change the selected list item color and getting the text of selected list item and put it into textbox

HTML (index.html)

<!DOCTYPE html>
<html>
<head>
  <title>Dynamic Content Issue</title>
  <link rel="stylesheet" href="style/topcoat-mobile-light.css">
  <link rel="stylesheet" href="style/style.css">
  <script src="javascript/jquery.js"></script>
</head>
<body>
  <!-- Header -->
  <div class="topcoat-navigation-bar">
    <div class="topcoat-navigation-bar__item center full">
      <h1 class="topcoat-navigation-bar__title">Dynamic Content Issue</h1>
    </div>
  </div>
  <!-- Cards List -->
  <div class="topcoat-list">
    <h3 class="topcoat-list__header">Static Cards List</h3>
    <ul class="topcoat-list__container cardUnorderedList">
      <li class="topcoat-list__item card">Master Card</li>
      <li class="topcoat-list__item card">Visa</li>
      <li class="topcoat-list__item card">American Express</li>
      <li class="topcoat-list__item card">Discover</li>
    </ul>
  </div>
  <br>
  <div class="txtCardValue">
    <input type="text" class=" topcoat-text-input" placeholder="Please Select a card" value="" disabled id="txtCardSelected">
  </div>
  <script src="javascript/main.js"></script>
</body>
</html>
    

CSS (style.css)

.txtCardValue{
    margin: 0 auto;
    text-align: center;
}

li.selected{
    color:#fff;
    background-color: #000;
}

JS/Jquery (main.js)

$('.card').on('click',function(){
    $('.cardUnorderedList li').removeClass('selected');
    $(this).addClass('selected');
   var textValue = $(this).text();
   $('#txtCardSelected').val(textValue);
});

Here comes the pain

When I added the card list dynamically and added the class="card" in it dynamically and tries to select list item Jquery was not able to fire the .on('click') event binded the the card class because the card class was not present in the DOM when page was created

modified HTML (index.html)

<!DOCTYPE html>
<html>
<head>
  <title>Dynamic Content Issue</title>
  <link rel="stylesheet" href="style/topcoat-mobile-light.css">
  <link rel="stylesheet" href="style/style.css">
  <script src="javascript/jquery.js"></script>
</head>
<body>
  <!-- Header -->
  <div class="topcoat-navigation-bar">
    <div class="topcoat-navigation-bar__item center full">
      <h1 class="topcoat-navigation-bar__title">Dynamic Content Issue</h1>
    </div>
  </div>
  <!-- Show the List button -->
  &lt;button class="topcoat-button" id="btnDynamic">Show Card List</button>
  <!-- Cards List -->
  <div class="topcoat-list">
    <h3 class="topcoat-list__header">Dynamic Cards List</h3>
    <ul class="topcoat-list__container cardUnorderedList">
      
    </ul>
  </div>
  <br>
  <div class="txtCardValue">
    <input type="text" class=" topcoat-text-input" placeholder="Please Select a card" value="" disabled id="txtCardSelected">
  </div>
  <script src="javascript/main.js"></script>
</body>
</html>
    

Additions in JS/Jquery (main.js)

var cardsArray = {
    "cards": [
            {"name": "Master Card","class": "card"},
            {"name": "Visa", "class": "card"},
            {"name": "American Express", "class": "card"},
            {"name": "Discover", "class": "card"}
        ]
};
$('#btnDynamic').on('click',function(){
  var output = '';
    for(i=0;i<4;i++){
        output += '<li class="topcoat-list__item '+ cardsArray.cards[i].class +'">' + cardsArray.cards[i].name +'</li>';
    }
    $('.cardUnorderedList').html(output);
});

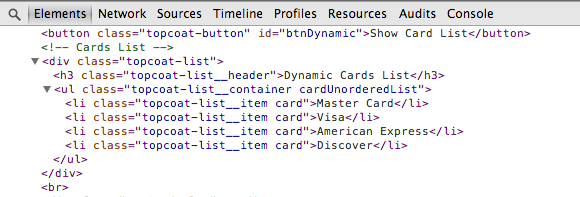
I was not able to select the list item when the class was added dynamically. As you can see in the inspect element screen shot the class was added to the list but jquery was not able to fire the event which is binded to the class because this class was not present when the page was created

inspect element image

Solution which worked:

Instead of calling on('click') event on the class="card" which is not present in the DOM during page creation, We have to call on('click') event on the thing which is present during the page creation and then bind the event with our card class

$(document.body).on('click','.card', function(){
    $('.cardUnorderedList li').removeClass('selected');
    $(this).addClass('selected');
    var textValue = $(this).text();
    $('#txtCardSelected').val(textValue);
});

You can download source files and apk file from here

You can watch issue and solution in the following video

Speedup Android development testing using Genymotion emulator

Much of android developer are fed up with the speed of the android emulators provided by the Google.These are too much slow sometimes it takes about 3-4 minutes to just startup the emulator for testing, and every Android developer does try not to close the emulator accidentally which will take another 3-4 minutes to restart.

Recently I came across new emulator known as Genymotion which is too much faster than the emutor provided by the Google, So I going to share the steps to install and use Genymotion on Mac OSX operating system with eclipse.

1. You have to download Oracle's VirtualBox.

2. Download Genymotion

  • visit genymotion's website http://www.genymotion.com
  • signup for new Genymotion account
  • After signup process is completed you can click on Download Genymotion which will open a new page.
  • Select a version of Mac OSX and Install it.

3. Configuring Genymotion

  • Select Genymotion from Launchpad.
  • Enter Username and Password of Genymotion with which you registered.
  • Currently you have no emulator present in your Genymotion you have to download it, Select a emulator from the list provided and add it to genymotion (it can take several minutes depending on the size of emulator).
  • click on settings of Genymotion and add Path to your Android SDK and click OK.
  • Select emulator you just downloaded and click on play button
  • If you got any error related to virtualbox, then close Genymotion
  • Open virtualbox and here you will find emulator you downloaded in the list OS present in Virtualbox.
  • select your emulator and start from Virtualbox
  • If you are not missing something you will be successfully able to start Android in Virtuabox
  • Now close it
  • After successfully launch through Virtualbox Open Genymotion from Launchpad.
  • Now select emulator and click play button you will be successfully able to launch it.

4. Install Eclipse Plugins for Genymotion.

  • Open Eclipse and move your cursor to Help -> Install New Software
  • Click Add… button a new prompt will appear with title Add Repository.
  • Give it any name like GenyMotion and in Location you have to add the following URL
    http://plugins.genymotion.com/eclipse
    and press OK
  • Now you have to select this repository from Work with: dropdown and Install the required plugins by click Next and accepting the Licence.
  • During installing process Eclipse will prompt and ask you whether you want to install unsigned plugin just click Ok on that prompt.
  • Restart the eclipse.
  • Click on Genymotion Virtual Devices Manager Icon present on the toolbar in eclipse.
  • You will be prompted to add path of Genymotion application you have to browse and locate the path of Genymotion application.

5. Testing application with genymotion.

  • Open Genymotion Virtual devices Manager.
  • Select and start the emulator with which you want to test the application
  • Right click on your Project in Package Explorer and select Run As -> Android Application.
  • Your application will get installed and launch on Genymotion's Emulator instantly.
Installing PhoneGap 3.0 and creating first Project

PhoneGap 3.0 is out and from this version phonegap is mandating users to use command-line tools to install and create projects.

command-line supports the following combination:

1. iOS (Mac)
2. Android (Mac, Linux)

From above it is clear that currently Android platform is not supported by command-line on Windows machine.

For installing PhoneGap 3.0 one must have node.js in their machine.

Installing Node.js

To get node.js one has to visit http://nodejs.org and click on download link available on website, Then a new page will open displaying package with different OS options.

Select the package for your OS and install it.

To check whether Node.js is fully installed and working on your system you must check node or npm on your command line (Terminal).

Installing PhoneGap

After successfully installing the Node.js on your system you must install PhoneGap using the following command.

sudo npm install -g phonegap
        

Creating the first app

phonegap create Test com.oodles.test TestProject
        

The above command uses phonegap to cretae a project in the present working directory of your terminal and there it create a project inside hello folder. Where all other files required for your project will be generated.

The other two arguments com.oodles.test and TestProject are optional you can edit them after creating the project through config.xml file of your project.

Building the Application

After generating the project each command will be executed inside the project directory which we have recently created in our case it was Test.

so we have to move the terminal inside this directory using the following command

cd Test
        

With this version one has to build project on one place in the www directory of the project and can build for various platforms(android,ios)

To build for specific platform like for iOS one can use the following command

phonegap build ios
        

Test app on emulator or device

phonegap install ios
        

As an alternative to the above two commands one can use combined command run which can perform both functions of build and install as shown in the following command

phonegap run android
        

If your device is connected to your machine and is properly configured then the application will run on the device otherwise it displays on the SDK emulator.

Using Native Appbar of Windows Phone with PhoneGap

After checking various native apps for Windows Phone using Appbar, I thinks why not I should use this native appbar of windows phone in my recent phonegap project. Only problem with this was how I can call methods written in javascript with this native appbar because javascript is not natively supported by Visual Studio for building Windows Phone apps.Below I am going to demonstrating how I accomplished this.

In Windows phone project open MainPage.xaml file and add the following code at the bottom of the file just before </phone:PhoneApplicationPage>

<phone:PhoneApplicationPage.ApplicationBar>
	<shell:ApplicationBar  IsMenuEnabled =”True” Mode=”Default” IsVisible=”True” Opacity=”1”>
		<shell:ApplicationBarIconButton IconUri=”www/images/image1.png” x:Name=”button1” Text=”Button1” Click=”button1_click”/>
        <shell:ApplicationBarIconButton IconUri=”www/images/image2.png” x:Name=”button2” Text=”Button2” Click=”button2_click”/>
	</shell:ApplicationBar>
</phone:PhoneApplicationPage.ApplicationBar>
      

Where IsVisible is used to show or hide the AppBar, IconUri is the path of icon used in this bar, Text is the name shown under the button and Click is the name of C-Sharp method invoked on the click of this button.

In the above code I have added two buttons named button1 and button2 Currently these are invoking C-Sharp methods button1_click and button2_click which are auto-generated, you can check check them by opening MainPage.xaml.cs file.

Here you can find these two methods:

private void button1_click(object sender, EventArgs e){}
        

and

private void button2_click(object sender, EventArgs e){} 
        

Now using these methods you can call the javascript methods using the following command


CordovaView.Browser.InvokeScript(“MyMethod1”);
        

Where MyMethod1 is the name of javascript method written in javascript file of your phonegap project.

let us say we have written two methods namely MyMethod1 and MyMethod2 written in javascript file as shown below.

function MyMethod1(){
	alert(“button 1”);
}

function MyMethod2(){
	alert(“button 2”);
}
        

and in MainPage.xaml.cs we have written two methods as shown below

private void button1_click(object sender, EventArgs e){
	CordovaView.Browser.InvokeScript(“MyMethod1”);
}

private void button2_click(object sender, EventArgs e){
	CordovaView.Browser.InvokeScript(“MyMethod2”);
}


By using above shown code when I click on the first button It will call the button1_click method of the c-sharp code which redirects the call to MyMethod1 written in javascript file of phonegap project.

Environment Setup and configuring Phonegap for Windows Phone 8

Recently I got to port an existing project made with phonegap for iOS and Android to project in Windows Phone 8. In below I am going to explain whole process to setup new project for Windows Phone 8 using Phonegap framework.

Requirements:-

Software

Hardware

  • 64 Bit CPU with Virtualization support
  • 4 GB RAM

To check if your CPU supports Virtualization:

  • You have to download coreinfo file.
  • Now extract this file which you have downloaded.
  • Open Command Prompt with administrative privileges.
  • Move to the location where you have extracted this file.
  • Type ‘coreinfo.exe -v’ command.
  • If you are using Intel processor and in output you got * (asterix) in front of EPTor If you are using AMD processor and in output you got * (asterix) in front of NPT then your processor supports SLAT.
  • If you got - (dash) in front of EPT or NPT then your processor does not supports SLAT.
  • You may have to enable virtualization (VT-x) from your BIOS settings usually it is disabled in Intel based machines.

Environment setup and Configuring

  1. Extract the Downloaded latest build of Phonegap.
  2. Move to lib -> windows-phone-8.
  3. Copy the CordovaWP8XX_X.zip file to My Documents\Visual Studio 2012\Templates\Project Templates\
  4. Open Visual Studio for Windows Phone and create New Project.
  5. Select CordovaWP8 project and fill the details for your project and press OK button.
  6. There is www folder where we are going to work for demo purpose Phonegap has generated some files and added to this folder so one can test cordova is working.
  7. To test this project select the emulator from dropdown and press the green play button.

Now to make your project you have to work in www folder of this generated project.

Twitter integration on PhoneGap using ChildBrowser and OAuth for iOS and Android Platforms

Twitter integration on PhoneGap using ChildBrowzer

I recently had a requirement to integrate one of my phonegap mobile application project with twitter . I am describing below the procedure I follow to integrate twitter with my phonegap project.

Getting Started:-

Step 1. Create a Twitter Appliation at https://dev.twitter.com/apps with the Read and write access permissions and Organization or personal website for callback url in Application.

Step 2. Integrate ChildBrowser in your Project use my recent blog for further assistance.

Step 3. Create a folder named js inside the www directory in your project.

Step 4. Download jquery from their website and add to your project’s www folder.

Step 5. Download OAuth.js file from this link and add to your project’s www folder.

Step 6. Replace the content of index.html file in the www folder of your project with the written below:-

<!DOCTYPE html>
<html>
    <head>
        <title></title>
        
        <meta name="viewport" content="width=device-width, initial-scale=1.0, maximum-scale=1.0, user-scalable=no;" />
            <meta charset="utf-8">
        <script type="text/javascript" charset="utf-8" src="cordova-2.1.0.js"></script>
        <script type="text/javascript" charset="utf-8" src="ChildBrowser.js"></script>
        <script type="text/javascript" charset="utf-8" src="jquery-1.8.2.js"></script>
        <script type="text/javascript" charset="utf-8" src="jsOAuth-1.3.6.js"></script>
        <script type="text/javascript">
            
            function onBodyLoad(){
                    document.addEventListener("deviceready", onDeviceReady, false);
            }
            
            function onDeviceReady() {
                var root = this;
                cb = window.plugins.childBrowser;
                if(!localStorage.getItem(twitterKey)){
                        $("#loginBtn").show();
                        $("#logoutBtn").hide();
                }
                else {
                    $("#loginBtn").hide();
                    $("#logoutBtn").show();
                }
                    
                if (cb != null) {
                    cb.onLocationChange = function(loc){ root.locChanged(loc); };
                    cb.onClose = function(){root.onCloseBrowser()};
                    cb.onOpenExternal = function(){root.onOpenExternal();};
                }
            }
            
            function onCloseBrowser() {
                console.log("onCloseBrowser!");
            }
                
            function locChanged(loc) {
                console.log("locChanged!");
            }
                
            function onOpenExternal() {
                console.log("onOpenExternal!");
            }
                
        </script>
                
        <script>
                    // GLOBAL VARS
            var oauth; // It Holds the oAuth data request
            var requestParams; // Specific param related to request
            var options = {
                consumerKey: 'xxxxxxxxxxxxxxx', // YOUR Twitter CONSUMER_KEY
                consumerSecret: 'xxxxxxxxxxxxx', // YOUR Twitter CONSUMER_SECRET
                callbackUrl: "http://Your-callback-URL/" }; // YOU have to replace it on one more Place                    
            var twitterKey = "twtrKey"; // This key is used for storing Information related 
                    
                    
            var Twitter = {
                init:function(){
                    // Apps storedAccessData , Apps Data in Raw format
                    var storedAccessData, rawData = localStorage.getItem(twitterKey);
                    // here we are going to check whether the data about user is already with us.
                    if(localStorage.getItem(twitterKey) !== null){
                    // when App already knows data
                    storedAccessData = JSON.parse(rawData); //JSON parsing
                    //options.accessTokenKey = storedAccessData.accessTokenKey; // data will be saved when user first time signin
                    options.accessTokenSecret = storedAccessData.accessTokenSecret; // data will be saved when user first first signin
                                
                    // javascript OAuth take care of everything for app we need to provide just the options
                    oauth = OAuth(options);
                    oauth.get('https://api.twitter.com/1/account/verify_credentials.json?skip_status=true',
                    function(data) {
                            var entry = JSON.parse(data.text);
                            console.log("USERNAME: " + entry.screen_name);
                            }
                        );
                    }
                    else {
                        // we have no data for save user
                        oauth = OAuth(options);
                        oauth.get('https://api.twitter.com/oauth/request_token',
                        function(data) {
                        requestParams = data.text;
                        cb.showWebPage('https://api.twitter.com/oauth/authorize?'+data.text); // This opens the Twitter authorization / sign in page
                        cb.onLocationChange = function(loc){ Twitter.success(loc); }; // Here will will track the change in URL of ChildBrowser
                                  },
                                  function(data) { 
                                          console.log("ERROR: "+data);
                                }
                    );
                    }
                    },
                        /*
                         When ChildBrowser's URL changes we will track it here.
                         We will also be acknowledged was the request is a successful or unsuccessful
                         */
                        success:function(loc){
                            
                            // Here the URL of supplied callback will Load
                            
                            /*
                             Here Plugin will check whether the callback Url matches with the given Url
                             */
                            if (loc.indexOf("http://Your-callback-URL/?") >= 0) {
                                
                                // Parse the returned URL
                                var index, verifier = '';
                                var params = loc.substr(loc.indexOf('?') + 1);
                                
                                params = params.split('&');
                                for (var i = 0; i < params.length; i++) {
                                    var y = params[i].split('=');
                                    if(y[0] === 'oauth_verifier') {
                                        verifier = y[1];
                                    }
                                }
                                
                                // Here we are going to change token for request with token for access
                                
                                /*
                                 Once user has authorised us then we have to change the token for request with token of access
                                here we will give data to localStorage.
                                 */
                                oauth.get('https://api.twitter.com/oauth/access_token?oauth_verifier='+verifier+'&'+requestParams,
                                          function(data) {
                                          var accessParams = {};
                                          var qvars_tmp = data.text.split('&');
                                          for (var i = 0; i < qvars_tmp.length; i++) {
                                          var y = qvars_tmp[i].split('=');
                                          accessParams[y[0]] = decodeURIComponent(y[1]);
                                          }
                                          
                                          $('#oauthStatus').html('<span style="color:green;">Success!</span>');
                                          $('#stage-auth').hide();
                                          $('#stage-data').show();
                                          oauth.setAccessToken([accessParams.oauth_token, accessParams.oauth_token_secret]);
                                          
                                          // Saving token of access in Local_Storage
                                          var accessData = {};
                                          accessData.accessTokenKey = accessParams.oauth_token;
                                          accessData.accessTokenSecret = accessParams.oauth_token_secret;
                                          
                                          // Configuring Apps LOCAL_STORAGE
                                          console.log("TWITTER: Storing token key/secret in localStorage");
                                          localStorage.setItem(twitterKey, JSON.stringify(accessData));
                                          
                                          oauth.get('https://api.twitter.com/1/account/verify_credentials.json?skip_status=true',
                                                    function(data) {
                                                    var entry = JSON.parse(data.text);
                                                    console.log("TWITTER USER: "+entry.screen_name);
                                                    $("#welcome").show();
                                                    document.getElementById("welcome").innerHTML="welcome " + entry.screen_name;
                                                    successfulLogin();
                                                    // Just for eg.
                                                    app.init();
                                                    },
                                                    function(data) {
                                                    console.log("ERROR: " + data); 
                                                    }
                                                    );
                                          
                                          // Now we have to close the child browser because everthing goes on track.
                                         
                                          window.plugins.childBrowser.close();
                                          },
                                          function(data) { 
                                          console.log(data);
                                          
                                          
                                          }
                                          );
                            }
                            else {
                                // Just Empty
                            }
                        },
                        tweet:function(){
                            var storedAccessData, rawData = localStorage.getItem(twitterKey);
                            
                            storedAccessData = JSON.parse(rawData); // Paring Json 
                            options.accessTokenKey = storedAccessData.accessTokenKey; // it will be saved on first signin
                            options.accessTokenSecret = storedAccessData.accessTokenSecret; // it will be save on first login
                            
                            // javascript OAuth will care of else for app we need to send only the options
                            oauth = OAuth(options);
                            oauth.get('https://api.twitter.com/1/account/verify_credentials.json?skip_status=true',
                                      function(data) {
                                      var entry = JSON.parse(data.text);
                                      Twitter.post();
                                      }
                                      );
                        },
                        /*
                         We now have the data to tweet
                         */
                        post:function(){
                            var theTweet = $("#tweet").val(); // You can change it with what else you likes.
                            
                            oauth.post('https://api.twitter.com/1/statuses/update.json',
                                       { 'status' : theTweet,  // javascript OAuth encodes this
                                       'trim_user' : 'true' },
                                       function(data) {
                                       var entry = JSON.parse(data.text);
                                       console.log(entry);
                                       
                                       // just for eg.
                                       done();
                                       },
                                       function(data) { 
                                       console.log(data);
                                       }
                                       );		
                        }

                    }
                    
                function done(){
                        $("#tweet").val('');
                    }
                    
                    
                    function successfulLogin(){
                        $("#loginBtn").hide();
                        $("#logoutBtn,#tweet,#tweeter,#tweetBtn,#tweetText").show();
                 
                    }
                    
                    function logOut(){
                        //localStorage.clear();
                        window.localStorage.removeItem(twitterKey);
                        document.getElementById("welcome").innerHTML="Please Login to use this app";
                        $("#loginBtn").show();
                        $("#logoutBtn,#tweet,#tweeter,#tweetText,#tweetBtn").hide();
                     
                    }
                    
                </script>
                <!--Code for Twitter ends here-->
            </head>
    <body onload="onBodyLoad()">


        <h4>Oodles Twitter App</h4>
        
            <table border="1">
                <tr>
                    <th>Login using Twitter</th>
                    <th>
                        <button id="loginBtn" onclick="Twitter.init()">Login</button>
                        <button id="logoutBtn" onclick="logOut();">Logout</button>
                    </th>
                </tr>
                <tr id="tweetText" style="display:none;">
                    <td colspan="2"><textarea id="tweet" style="display:none;"></textarea></td>
                </tr>
                <tr id="tweetBtn" style="display:none;">
                    <td colspan="2" align="right">
                        <button id="tweeter" onclick="Twitter.tweet();" style="display:none">Tweet</button>
                    </td>
                </tr>
                <tr><td colspan="2"><div id="welcome">Please Login to use this app</div></td></tr>
            </table>

      
    </body>
</html>

Step 7. Replace the Consumer Key, Consumer Secret and Callback URL in the index.html file with your’s which as mentioned in your Twitter Application.

Step 9. Run the App.

Implementing ChildBrowser plugin in PhoneGap for Android and iOS platforms

Chilbrowser android ios phonegap

In one of my recent PhoneGap mobile project I needed to open an external link in my app for this I used the child browser plugin. It allows app to display external web pages within the PhoneGap without exiting your app to view the link.It creates a popup browser that is shown in front of the app ,when the user presses the back button they are simply returned to the app.I am going to share the integration process of the ChildBrowser plugin in the PhoneGap app in Android and iOS platforms.

Getting Started:

Following steps are for Phonegap 2.1

Android

Step 1. Download the plugin from GIT.(You need GIT client to follow the further steps you can download the GIT client from their site http://www.github.com and while installing select the checkbox of commandline) after installation follow the below described steps.

  • Goto command prompt or terminal select the directory where you want the content of the repo using cd command.
  • Type following command:
		git clone https://github.com/phonegap/phonegap-plugins

it will download all the set of plugins supported by PhoneGap

Step 2. Create a Basic PhoneGap app(You can view my other blog for further assistance).

Step 3. From the Downloaded set of plugin move to Android directory then select ChildBrowser and move in it then to the directory named 2.0.0 there will be two directories named src and www.

Step 4. Copy the content of the src folder from downloaded plugins to your projects src folder.

Step 5. Copy the content of the www folder from the downloaded plugins to you projects assets/www folder.

Step 6. In your project res/xml/config.xml file add the following line as a child to the plugin tag:

<plugin name="ChildBrowser" value="com.phonegap.plugins.childBrowser.ChildBrowser"/>

Step 7. In the file index.html in the assets/www directory Replace the content with the described below.

<!DOCTYPE HTML>
<html>
	<head>
		<title>ChildBrowser</title>
		<script type="text/javascript" charset="utf-8" src="cordova-2.1.0.js"></script>
		<script type="text/javascript" charset="utf-8" src="childbrowser.js"></script>
		<script>
			function onBodyLoad()
			{		
				document.addEventListener("deviceready", onDeviceReady, false);
			}
			function onDeviceReady()
			{
        			cb = window.plugins.childBrowser;
			}
		</script>
	</head>
	<body onload="onBodyLoad();">
		<p>click the button to open Oodles Technologies WebSite in ChildBrowser</p>
		<button onclick="cb.showWebPage('http://www.oodlestechnologies.com')">click</button>
	</body>
</html>

Step 8. Run the app.


iOS


Step 1. Download the plugin from GIT.(You need GIT client to follow the further steps you can download the GIT client from their site http://www.github.com and while installing select the checkbox of commandline) after installation follow the below described steps.

  • Goto command prompt or terminal select the directory where you want the content of the repo using cd command.
  • Type following command:
		git clone https://github.com/phonegap/phonegap-plugins

it will download all the set of plugins supported by PhoneGap

Step 2. Create a Basic PhoneGap app(You can view my other blog for further assistance).

Step 3. From the Downloaded set of plugin move to iOS directory then select ChildBrowser and move in it there you will find various files related to the plugin.

Step 4. Drag all of the .m and .h files from the ChildBrowser folder to the Plugins folder of your project when prompted select "Create folder references for added folders" and "copy item into destination group's folder(if needed)" options.

Step 5. Drag the .bundle and .xib files from the ChildBrowser folder to the Resources folder of your project.

Step 6. In the Resources folder of your Project you will find a file named Cordova.plist in it you will find a bunch of key/value pairs,In the Plugins category add a key ChildBrowserCommand and Value ChildBrowserCommand (as shown below).

View of plugin and externalhosts in cordova.plist


Step 7. In the same file stated above you will find a category named ExternalHosts add the name of website you want to open using ChildBrowser or you can simply add * so that it can access all sites (as shown above).


Step 8. Copy ChildBrowser.js from the ChildBrowser folder to the www folder of your project.

Step 9. In the file index.html in the www directory Replace the content with the described below.

<!DOCTYPE HTML>
<html>
	<head>
		<title>ChildBrowser</title>
		<script type="text/javascript" charset="utf-8" src="cordova-2.1.0.js"></script>
		<script type="text/javascript" charset="utf-8" src="ChildBrowser.js"></script>
		<script>
			function onBodyLoad()
			{		
				document.addEventListener("deviceready", onDeviceReady, false);
			}
			function onDeviceReady()
			{
        			cb = window.plugins.childBrowser;
			}
		</script>
	</head>
	<body onload="onBodyLoad();">
		<p>click the button to open Oodles Technologies WebSite in ChildBrowser</p>
		<button onclick="cb.showWebPage('http://www.oodlestechnologies.com')">click</button>
	</body>
</html>

Step 10. Run the App.

Facebook plugin integration for PhoneGap 2.1 for iOS and Android

In this blog I am going to describe the process of integrating the Facebook Plugin for PhoneGap 2.1 in iOS and Android platforms.

Let's Get Started

Android

1. For taking the advantage of this plugin make register your app on Facebook-Developer.

2. Download the plugin from GIT. (You need GIT client to follow the further steps you can download the GIT client from their site http://www.github.com install commandline also while installing.)

  • goto command prompt or terminal select the directory where you want to download the content of repo using cd command.
  • type following command:
git clone https://github.com/davejohnson/phonegap-plugin-facebook-connect

It will download the official facebook plugin to the destination you described using command line.

3. Make a Basic PhoneGap app (You can view my previous blog for further assistance).
  NOTE: You must set Minimum Android Target to eight.

4. Copy the written below to the config.xml which is present in the res -> xml under plugin as a children of it:


5. Now its Time to make a build of Android's Facebook Software Development Kit & then including generated javascript file by going through the following steps:

  • Move inside the directory you downloaded from GIT.
  • Execute  git submodule update --init it will update the plugin to latest build.
  • Now its time to copy the folderssrc & res directories from lib -> facebook-android-sdk ->facebook  to  in your project.if dialog box appears press No.
  • open fbDialog.java file and in the top of this file import the generated Android Cordova package.
  • Open the Terminal and write cd facebook-android-sdk/facebook after this write another command jar cf facebook-android-sdk.jar src. By typing these commands there will be a file named facebook-android-sdk.jar,Copy this in the generated Cordova-Android's under libs folder & also add its build path select the libs folder in your project and right click on it select Build Path and move to Configure Build Path here a new window will open select libraries from the above tab Menu and click on Add jar then locate the Facebook-android-sdk.jar file from your project.

6.  Return to Downloaded Facebook Plugin Directory in it move to native and then to android directory from here copy src directory to your project.if a dialog box appears press No.

7. From Facebook Plugin Directory copy following files to www folder present in assists of your android project.

  • cdv-plugin-fb-connect.js present in www directory.
  • facebook_js_sdk.js present in lib directory.
  • contents of folder Hackbook present in example directory, if dialog box appears click Yes.

8. You must Enter your Facebook's App-ID in the index.html file.

9. Run your application Project

issues

  • App crashes in Android 4.x while login through facebook

Solution: You have to make following changes in the ConnectPlugin.java present in the org.apache.cordova.facebook package in the src folder in the eclipse. find and change the following line

public void onActivityResult(int requestCode, int resultCode, Intent data) {

with

public void onActivityResult(final int requestCode, final int resultCode, final Intent data) {

and find and change the following line

facebook.authorizeCallback(requestCode, resultCode, data);

with

new Thread(new Runnable(){
		@Override
		public void run() {
			facebook.authorizeCallback(requestCode, resultCode, data);
		}
	}).start();


iOS


1. For taking advantage of this plugin you have to register your application with Facebook_Developer_Portal and have an APP-ID (https://developers.facebook.com/apps).

2.  Download the plugin from the oficial link.
Note: The above plugin described in the android section does not supports the PhoneGap 2.x link provided here will have the support for PhoneGap 2.x.

3. You have to Download and install the current Facebook SDK iOS Dev Center.

4.   Make a Basic PhoneGap app (You can view my previous blog for further assistance).

5. Now its time to add Facebook SDK for iOS by following steps .

  • You have to copy the Facebook's Software Development Kit Framework made for iOS by drag and drop FacebookSDK.framework directory from SDK's directory to the Frameworks directory in your Project,Choose the Create Group option when a dialog box appears.
  • Now copy by drag and drop the FacebookSDKResources.bundle from Resources directory present in FacebookSDK.framework to the Frameworks directory of project,Choose the Create Group option when a dialog box appears.
  • You now need to add header by copying by drag and drop DeprecatedHeaders Directory from the FacebookSDK.framework/Versions/A/ directory to Frameworks folder in project,Choose the create group option when a dialog box appears.
  • click project's icon in project Navigator,move to the tab saying Build Settings,then find Other Linker Flags from search tool,then you have to add -lsqlite3.0 as value in it.
  • From Plugin directory copy facebook_js_sdk.js present in lib to www folder of your project.
  • click project's icon in project navigator, In Target move to Tab named Build Phases click on Link Binary with Libraries and add Social.framework,Accounts.framework,AdSupport.framework frameworks and remember to select optional framework so that it can support the iOS6 pre apps.

6.  Adding the Facebook plugin in Project.

  • From Plugin directory move to iOS directory present in native directory and copy whole contents of it to your project (commonly in Plugins directory group),choose the create group option when a dialog box appears.
  • Move in Resources folder in your project here you will find file named the Cordova.plist open it and add a Key-value pair as a child under Plugins where key will be org.apache.cordova.facebook.Connect and value is FacebookConnectPlugin.
  • In the Plugins directory copy whole content of www directory to www in your Project.
  • Now its time to do Whitelisting of Facebook's Domains,Open Cordova.plist present in Resources Directory in Project,then add domains given below as the list of ExtenalHosts.

*.facebook.*
*.fbcdn.*
*.akamaihd.*

Or you can allow all domains with:

*

7.  Running the example.

  • Move to Resources folder in your project, you will find a file named (project's name)-Info.plist, open it add new entry with key-value pair,where key will be FacebookAppId and value will be your Facebook's App-ID.
  • now open the (project's name)-Info.plist file as Source code by Right Clicking on it and selecting Source Code in Open As option and here you have to add the following (You need to add your Facebook's App-ID in the code)

CFBundleURLTypes

    
        CFBundleURLName
        [SCHEME_ID]
        CFBundleURLSchemes
        
            fb[APP_ID]


SCHEME_ID and APP_ID SCHEME_ID is a unparalleled identifier in reverse domain order (i.e com.oodles.cordova.myscheme), APP_ID is the app id which you get after registering your app with facebook.

  • In Plugin directory you will find folder named example, copy HackBook or Simple folder contents to your www folder of your project.
  • change the App-ID in index.html
  • Run the App.

issues :-

  • Facebook SDK 3.1 for ios runs on ios 6 but crashes on ios 5.x (dyld Error)

solution : While  adding AdSupport.framework, Social.framework, and Accounts.framework, there is drop down menu to the right that where you can select between "Required" and "Optional”, Here you have to select it as Optional.

Installing and configuring PhoneGap for iOS, Android and Windows Mobile development projects

More recently I started using PhoneGap for Mobile application development. I decided to write this blog so that others can learn how to setup development environment for PhoneGap with ease for their project. This Blog will describe how to set up your development environment for PhoneGap for Android, Windows Phone and iOS then run a sample application .

OK let’s get started by knowing what PhoneGap is.

PhoneGap (also known as Apache Cordova) is an free cross platform application development framework developed by Nitobi, now acquired by Adobe Systems. It enables one to build applications for various devices using their HTML5, CSS3 and javascript knowledge, instead of using specific languages such as Java,c-sharp. This framework give us the ability to use services of the phone by using JavaScript.

PhoneGap currently supports 7 mobile platforms.Features supporting information for each devices can be obtained from here.


iOS

setup development environment for PhoneGap for iOS platform.

1. Requirements:

  • Xcode 4.3 or advanced
  • Xcode Command Line Tools
  • Macnitosh OS X 10.7 or advanced
  • Things necessary for installation on iOS device:
    • developer certificate from apple for ios Development

2. softwares required for installation

  • You need Xcode which can be downloaded free of cost from Mac App Store
  • Command Line Tools for Xcode are requires you can download them using the written steps Xcode Preferences -> Downloads -> Components -> Command Line Tools -> Install

3. Download PhoneGap and Unzip

  • You have to download the current  version of PhoneGap from their website http://phonegap.com.
  • Extract its contents  we will deal with the ios directory present in lib folder.

4. Setup New Project

  • Open Terminal and locate the bin directory present in lib/ios folder.
  • Type the ./create {project_folder_path} {package_name} {project_name} then press Enter.
  • eg. ./create ~Desktop/myproject com.oodles oodles
  • Locate and open the  newly created  project by double clicking the .xcodeproj file present there.

5.Deployment

on the Simulator

  • Change the target to iPad or iPhone Simulator from the above toolbar.
  • press Play button from above toolbar.

To Device

  • You have to attach device to the machine.
  • Change the target to attached iOS device.
  • Press Play button from  above toolbar.

Android

setup development environment for PhoneGap for Android platform.

1. Installing the Prerequisite softwares.

Eclipse

  • Download Eclipse Classic This will be ZIP file, extract the contents of it.

Java SDK

Android SDK

  • Download and install the Android SDK package from here.

ADT plugin for eclipse

Note: If you have trouble acquiring the plugin, try using “http” in the Location URL, instead of “https”.


Note: While Installation if a warning appears displaying the authenticity or validity of the software cant’t be established, click OK

  • Open Eclipse, then click on Help -> Install New Software.
  • Click Add, present on the top-right corner.
  • In the new dialog box that appears after clicking Add, enter “ADT Plugin” for the Name and the following URL for the Location: http://dl-ssl.google.com/android/eclipse/
  • Press OK
  • In the Available Software dialog, select the Developer Tools Checkboxthen Press Next.
  • On Next Screen, you‘ll see a list of toolsthe you are going to download. Press Press.
  • Read then accept the license agreements, then Press Finish.
  • When the installation completes it will asks for Restart the eclipse,press restart.
  • After You’ve installed ADT and restarted Eclipse, you must specify the location of your Android SDK directory:
    1. Select Window > Preferences. to open the Preferences panel (on Mac OS X, Select Eclipse preferences).
    2. Select Android from the left panel.You may see a dialog asking whether you want to send usage statistics to Google. If so, make your choice and click Proceed.
    3. For the SDK Location in the main panel click Browse... and locate your downloaded Android SDK directory(such as android-sdk-linux_x86).
    4. Click Apply,then OK.

2. Download PhoneGap and unzip

  • Download latest build of PhoneGap from their website http://phonegap.com. and Extract the Contents of it we will deal with the android folder present in the lib directory.

3. Create New Project

  • Open Terminal and move to the bin folder present in the android directory, using cd command of terminal.
  • Type the ./create {project_folder_path} {package_name} {project_name} then press Enter.
  • eg. ./create ~Desktop/myproject com.oodles oodles
  • Open Eclipse then click on File -> New Project.
  • Then a new popup menu will appear select Android -> Android Project From Existting Code.
  • Then Select Folder where the new Project has been generated through the create command.
  • Press Finish.

4. Deployment

To Simulator

  • Right click on your current project then move to Run As -> Android Application
  • Eclipse arises a dialog box which ask you to select an AVD. If there is no AVD Present, then you have create a new one.

To Device

  • First Check USB debugging is not disabled on your device then plugyour device to the system. (Settings > Applications > Development)
  • Right click on your current project and move to Run As -> Android Application


Windows Phone


setup development environment for PhoneGap for Windows Phone platform.

1. Requirements

  • Windows 7 or Windows Vista with SP2
  • Windows Phone SDK

2. Installing the Prerequisite softwares

3. Download PhoneGap and unzip

  • You can Download the latest version of PhoneGap from their website http://phonegap.com and extract its contens we will deal with windows-phone-7 directory present in libs folder.

4. Setup New Template

  • Open CordovaSolution.sln with Visual studio Express for Phone present in windows-phone-7 -> templates -> standalone
  • Now choose Export from the file Menu a new window will appear give name to new Template and fill other details Then Click Finish.
  •  

5. Create New project

  • Start Visual Studio for phone
  • Select New Project then from Templates select the Template which you have created.
  • Give it a name and click OK.

6. Deployment

To Emulator

  • Make sure to have Windows Phone Emulator selected in the top drop-down menu.
  • Hit the green play button beside the Windows Phone Emulator drop-down menu to start debugging or press F5.

To Device

  • Your device must be registered in order to test your application.you can read the documentation for deploying and testing on Windows phone device by going through this link.
  • You must check that phone is connected and screen must be unlocked.
  • In the visual studio ,select the Windows Phone device from the drop down menu.
  • Press F5 or click the play button near the drop-down menu.


Banner

Don't just hire talent,
But build your dream team

Our experience in providing the best talents in accordance with diverse industry demands sets us apart from the rest. Hire a dedicated team of experts to build & scale your project, achieve delivery excellence, and maximize your returns. Rest assured, we will help you start and launch your project, your way – with full trust and transparency!