|
Vineet  Kundra Oodles

Vineet Kundra (Backend-Associate Consultant - Development)

Experience:3+ yrs

Vineet is a skilled Backend developer with specialization in Python. He has a sound knowledge and has hands-on experience in Python, Odoo Framework, Django Framework, RestApi, JavaScript, Ajax, HTML, CSS, Debugging, Jinja2, Oop’s, Xml Templating, Postgresql. He has made significant contributions to various client projects, including Hruday (Application Tracking system), Budget Management, Libre Last (Integration).

Vineet  Kundra Oodles
Vineet Kundra
(Associate Consultant - Development)

Vineet is a skilled Backend developer with specialization in Python. He has a sound knowledge and has hands-on experience in Python, Odoo Framework, Django Framework, RestApi, JavaScript, Ajax, HTML, CSS, Debugging, Jinja2, Oop’s, Xml Templating, Postgresql. He has made significant contributions to various client projects, including Hruday (Application Tracking system), Budget Management, Libre Last (Integration).

LanguageLanguages

DotEnglish

Conversational

DotHindi

Fluent

Skills
Skills

DotJava

60%

DotMySQL

80%

DotNode Js

60%

DotAWS

60%

DotBarcode/RFID

60%

DotPostgres

80%

DotJSON

60%

DotHTML5

80%

DotXML

80%

DotCloud Platforms

60%

DotjQuery

60%

DotRESTful API

60%

DotERPNext

60%

DotAngular/AngularJS

60%

DotWebhooks

60%

DotWhatsApp API

60%

DotJavascript

80%

DotRESTful API

60%

DotPython

80%

DotZoho

60%

DotQuickBooks

60%

DotXAPI

60%

DotOdoo

80%

DotDjango

60%

DotNo SQL/Mongo DB

60%

DotOAuth

60%

DotMoodle

60%

DotBlackboard

60%

DotReact Native

60%

DotHTML, CSS

60%

DotReactJS

60%

DotSCORM

60%
ExpWork Experience / Trainings / Internship

Dec 2021-Present

Associate Consultant - Development

Gurugram


Oodles Technologies

Gurugram

Dec 2021-Present

EducationEducation

2017-2020

Dot

Dr. Akhilesh Das Gupta Institute of Technology and Management

B.Tech-EEE

Top Blog Posts
Odoo 17 Access Rights

Managing Access Rights Through the User Interface


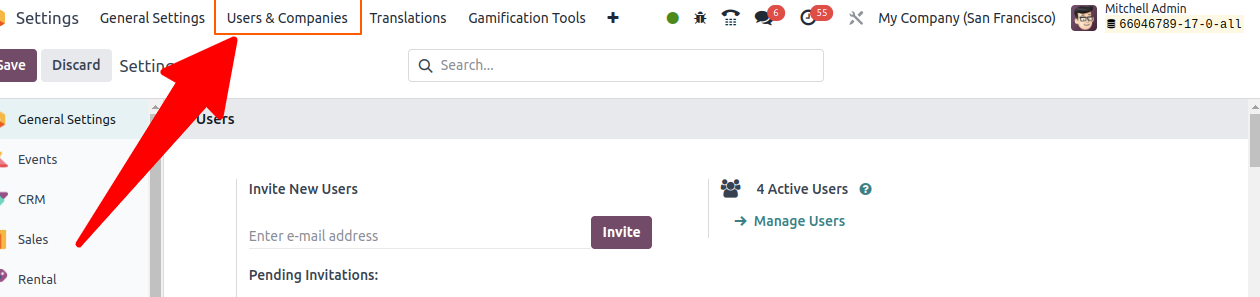
  1. Navigate to Settings:
  2. Go to the Settings app.

Ensure that the developer mode is activated. You can activate developer mode by adding ?debug=1 to the URL or by clicking on the "Activate the developer mode" link at the bottom of the settings page.


Users & Companies

Navigate to Settings -> Users & Companies -> Users.
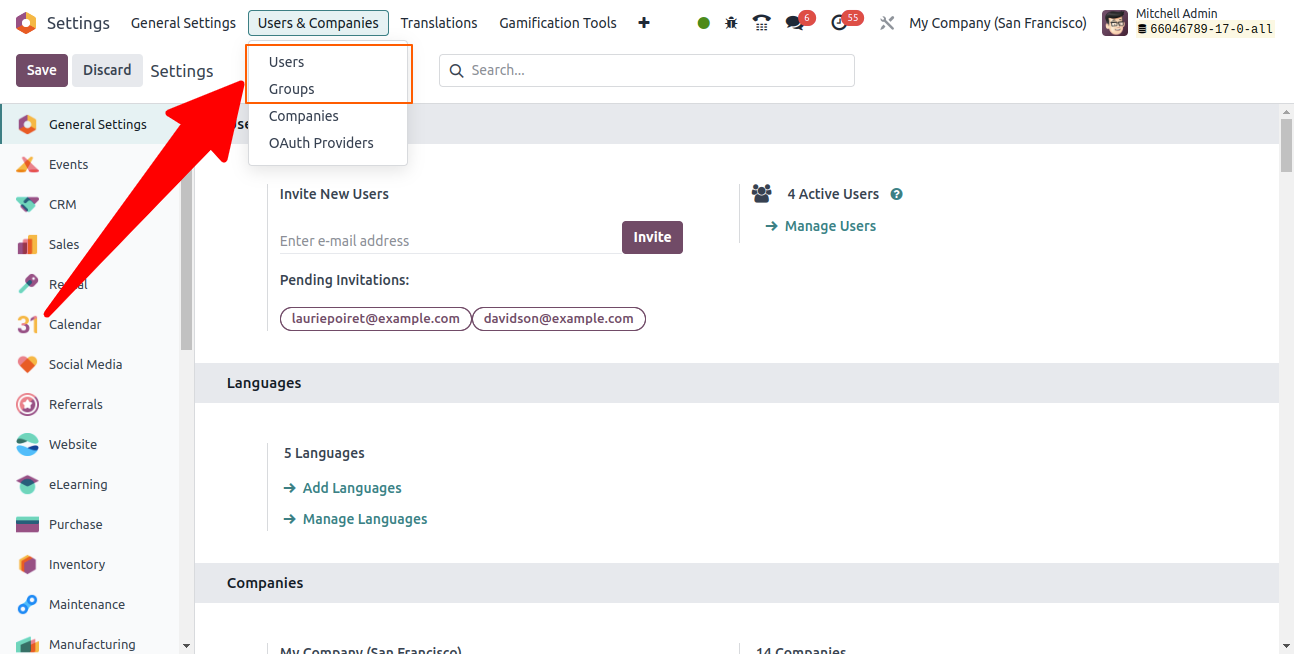


Manage User Roles


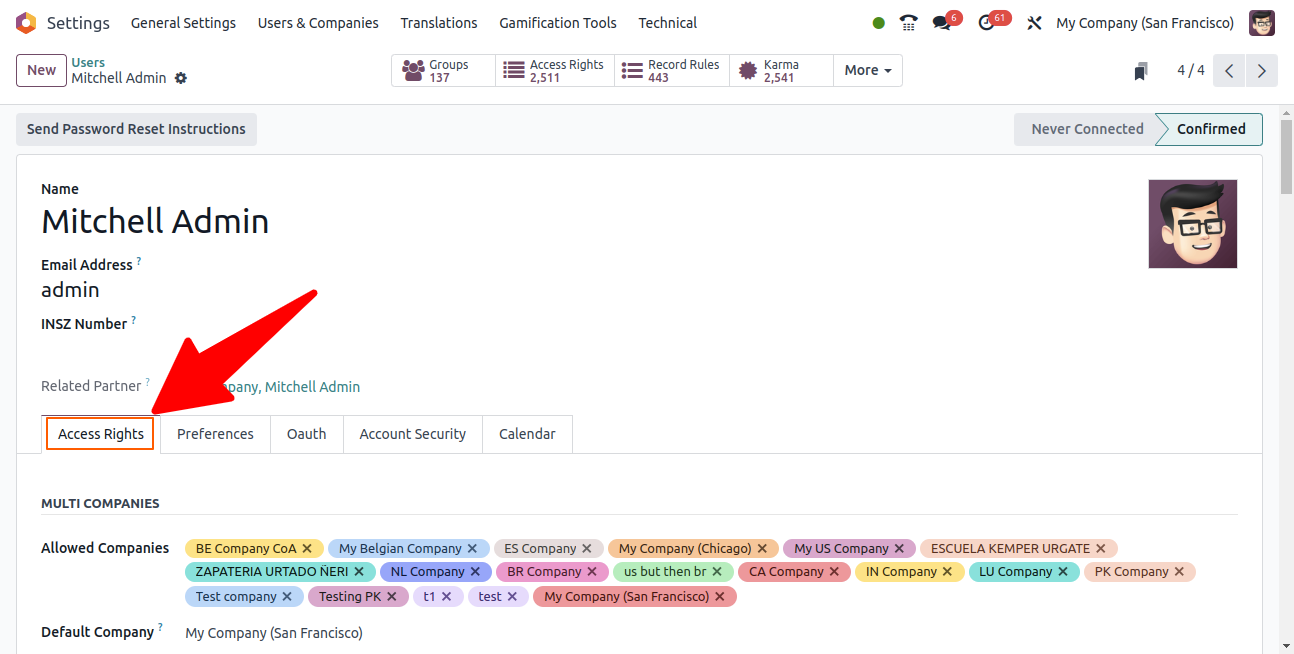
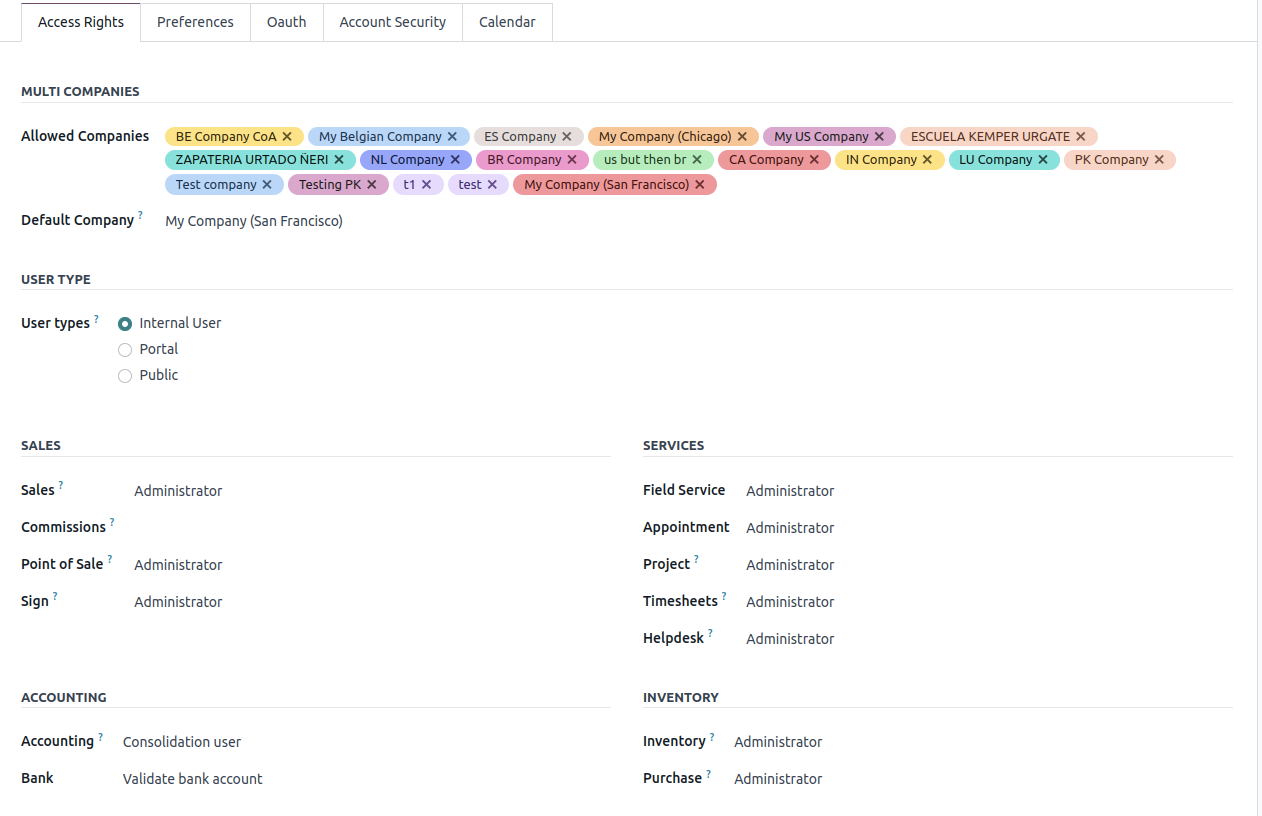
  1. Open the user for whom you want to set the access rights.
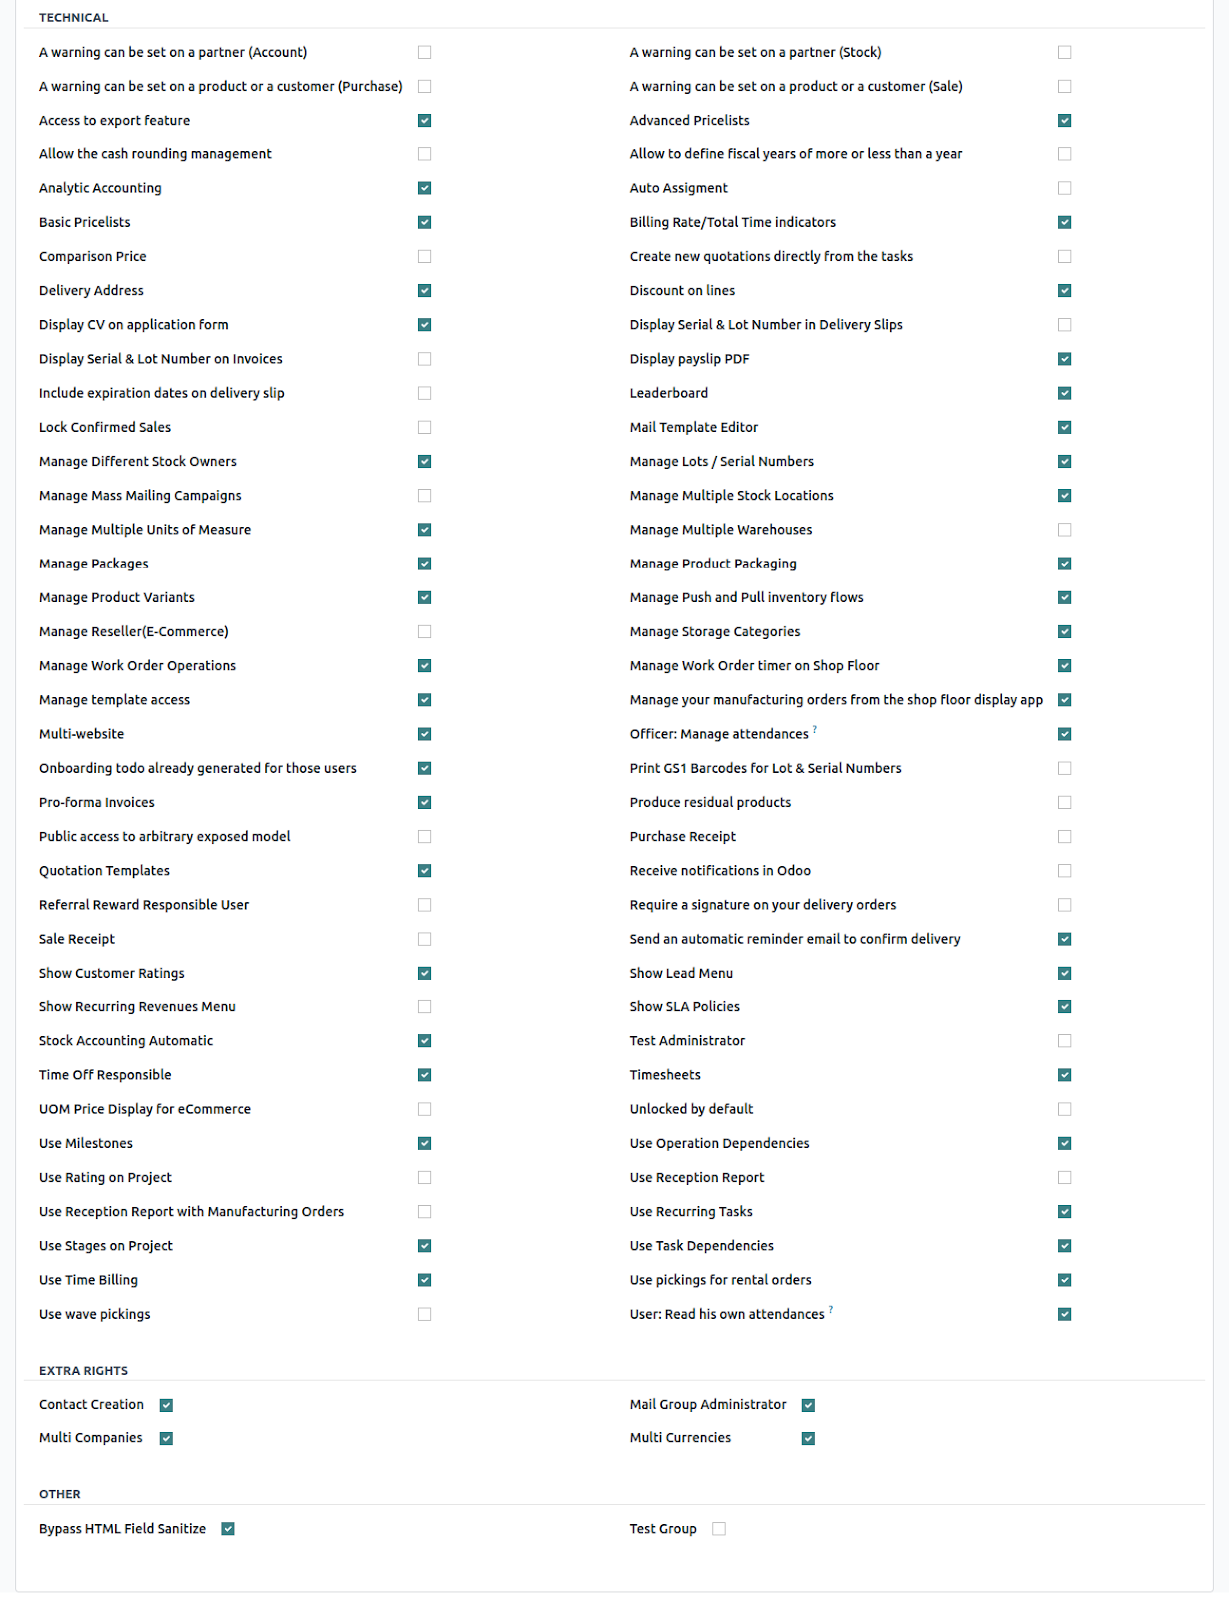
  2. Under the "Access Rights" tab, you can assign the user to different groups. Each group has predefined access rights.


User Groups


  1. Navigate to Settings -> Users & Companies -> Groups.


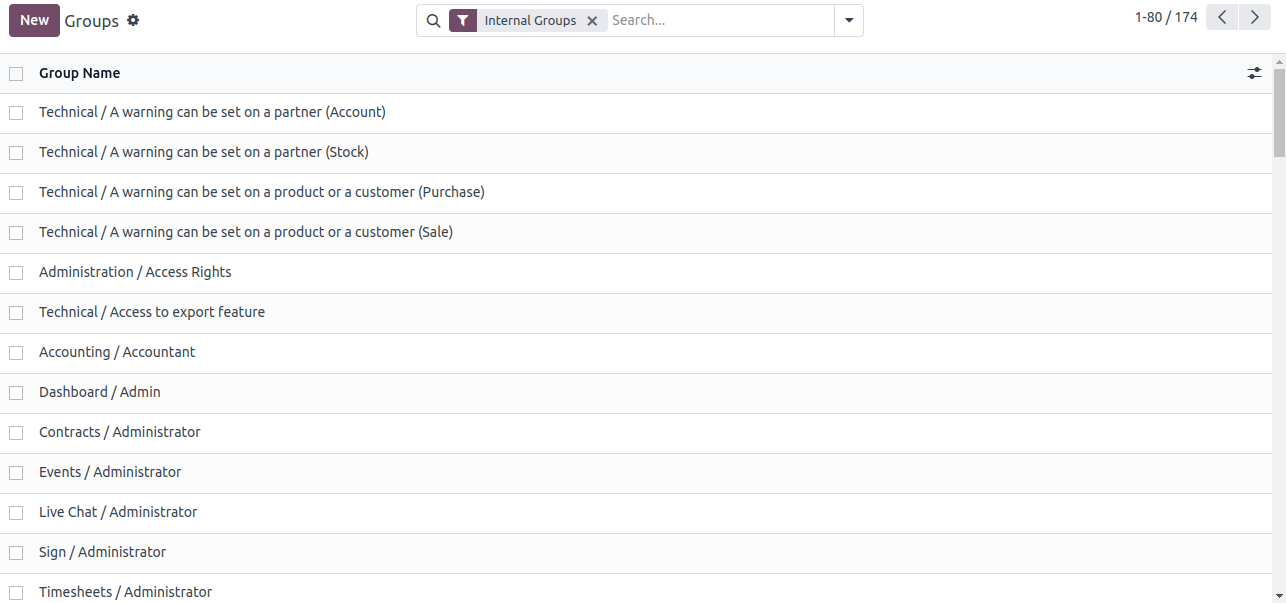
Here, you can see all the available groups and their permissions. You can create new groups or modify existing ones to customise access rights.


Managing Access Rights Through Custom Modules


To define access rights in a custom module, you need to create ir.model.access.csv and optionally use security.xml for record rules. Here is how you can do it:

  1. Define Access Control List (ACL) in ir.model.access.csv

Create or update the ir.model.access.csv file in your module's security directory. This file defines which groups have what kind of access to each model.

Example: security/ir.model.access.csv

  • access_my_model_user: ID of the access control record.
  • my.model user: Name of the access control record.
  • model_my_model: ID of the model (you need to refer to the model's XML ID).
  • base.group_user: ID of the group (you can use predefined groups or your custom groups).
  • 1,0,0,0: Permissions for read (1), write (0), create (0), and delete (0).

2. Define Record Rules in security.xml

Record rules are used to define domain-based access controls. Create or update the security.xml file in your module's security directory.

Example: security/security.xml

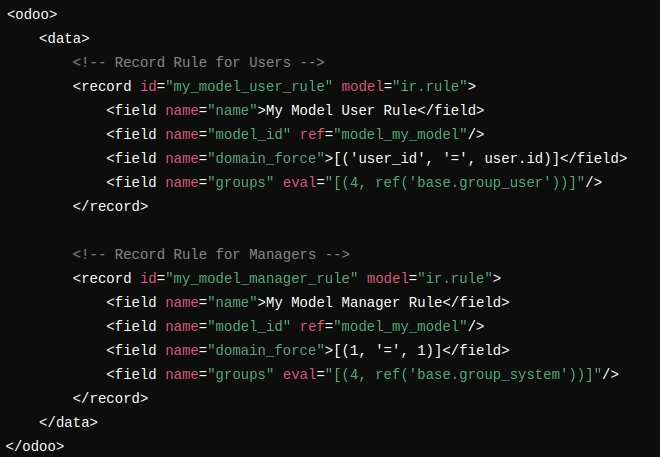
  • my_model_user_rule: ID of the record rule.
  • My Model User Rule: Name of the record rule.
  • model_my_model: Reference to the model.
  • domain_force: Domain expression to apply.
  • base.group_user: Group to which this rule applies.


Category: ERP Solutions
Stripe Payment Integration in Odoo: A Comprehensive Guide

Configuration Part


First You Need To create a Developer Account in Stripe after that go to Developers Screen.

Inside the “Api Keys” tab you can get the “Publishable Key and Secret Key” which will be used in the Odoo Stripe configuration part later.


Oodles ERP


Now go to the Settings>Payments


Oodles ERP


Inside the Payment Method tab you can activate the available payment method that can we available on the payment screen according to the currency.


Oodles ERP


 Now Need to Install the Stripe Integrator Module in odoo.


Oodles ERP


Now Go Inside the Sale>Configuration>Stripe Configuration


Inside Stripe Configuration Menu Add a Stripe Account Details that we have Stored previously we can use those for the stripe payment. 


Also, Read Stripe Payment Gateway Integration In Java


Oodles ERP


We can configure here publishable and secret key and can set the state of this stripe Account. 


After that need to click on the Generate your Webhook for receiving the webhook response of payment's.


Note: Only one Stripe Account will be active at once.

 Oodles ERP


Now you are successfully configured the stripe account in Odoo.


Functional Part


Now Go to the Sale and Create a Quotation.
 

Oodles ERP
 

After creating quotation click on send by email button.


Oodles ERP


When you click on sign and pay quotation you will be redirected to Customer portal.

Here You can sign as this quotation same as previously provided in Odoo. After that you can see there was an Payment intent is being loaded in which various payment options other then card has been seen and you can select any of these payment methods for paying this quotation.
 

Oodles ERP


(*above image you can see different payment method options)
 

These Payment Method are totally configurable you can check it in the configuration part.
 

You can see the different payment status of the payment as the payment proceed.

(Here Successfull Payment  Status has Shown)


Also, Read Payment Integration With Paytm In a Spring Boot Application


Oodles ERP 


That processed payment has been Created inside database and linked with this sale order.

the state of that payment is in Pending state initially and it get's changed according to the incoming payment webhook response status.

When the payment is confirmed the state of the sale order will be changed to Sale Order.

You can check the linked payments inside the Payment Smart Button.


Oodles ERP


Inside the Payments Form you can see the linked payments details.

And Refund Transaction button is there for refunding this transaction.

It would again create a payment and when webhook response gets the refund has been processed then state of the refund payment was changed to Refund.


Oodles ERP


For Accounting Process we can create invoice from the Sale Order using the Create Invoice Button then on confirming this invoice the recorded payment was also being linked with this invoice automatically.

And you can also follow the refund invoice process same it would pick the refund linked transaction of the sale order automatically. 

Category: ERP Solutions
Odoo Shopify Connector

The Odoo Shopify connector helps integrate Odoo with Shopify, enabling an enterprise to efficiently manage their eCommerce store with better control, transparency, and traceability. 


First of all, create an app inside your Shopify store for linking it with Odoo.


For creating an app, Go to : 


  • Apps > App and sales channel settings > Develop apps for your store > Create app


  • After creating the app, configure the admin API integration.


Also, Read QuickBooks Online Integration With Odoo


  • Click on the Admin API Integration configure button and Add Scopes for the newly created app.


  • Select All Scopes and save.


  • Now install this newly created app on your Shopify store.


  • After Installing the app on the Shopify Store, get your Application API Credentials and save them for future references.


  • API Access Token
  • API key
  • Secret Key


  • Now install the Shopify Connector app in Odoo.


  • After installing the app, you can view the Shopify menu(if You are administrator, else you have to give the user Shopify Admin Group permission inside user Settings).


  • Now click on the Shopify menu and create Shopify Shop Record.


  • Set Connection Name, fill API credentials of Shopify and fill the other needful information.


  • Now click on the import tab and start importing data from Shopify to Odoo.


  • Click on ‘Import All Customers.'


  • It will import all the customers that are present in your Shopify store to Odoo.


  • Click on ‘Import Products Categories.'


  • It will import all the product categories that are present in your Shopify store to Odoo under Shopify products category.


  • Click on import products


  • It will import all the products and  their variants that are present in your Shopify store to Odoo.


  • Click on ‘Import Orders.'


  • It will import all the orders and draft orders that are present in your Shopify store to Odoo.


You may also like to read Odoo Tally Connector


  • Imported draft orders will be seen in Sale Orders records under sales menu in Quotation status.


  • Imported orders will be seen in sale orders under the sales menu in ‘Sales Order Status.'


  • If the order status is ‘paid' in Shopify, an invoice with paid status and delivery order with status ‘done' is automatically generated in Odoo.


  • If the order status is ‘return' in Shopify, an invoice with ‘Reverse' status and delivery order with status ‘Cancel/Return' is automatically generated in Odoo.


  • If the order status is ‘pending' in Shopify, an invoice with ‘Not Paid' status and a delivery order with the status ‘Ready' is automatically generated in Odoo.


  • Click on update all product stock quantities.

Category: ERP Solutions
Odoo Tally Connector

Tally Integration Export Feature


Tally Side Configuration


  • First, create Tally Synchronisation server port from which the data is to be fetched via Tally.

  • Tally>Exchange>Data Synchronisation>Client/Server configuration>
  • Set TallyPrime as server and port as 9000.


Odoo Side Configuration


  • Import needed libraries.
  • Then create company in Odoo with the same name as Tally company for importing data in Odoo Company and then create/set receivable and payable accounts for the newly created company in Odoo.
  • Now select the default company and current company same as the Tally company for which you are fetching records.


  • When a new company is created, a company partner is also created in the contacts. Please select a company name inside sales & purchase > company field.


  • Now You are all set for importing Tally data in Odoo.
  • The Odoo Tally module UI is very simple.
  • Click the “Fetch Tally Record” Master checkbox and then click on Migrate Data.


  • You can export Accounts and Product Masters from Tally and adjust product inventory in Odoo.

From Accounts Master, you can fetch :

  • Ledgers
  • Different types of Tally Vouchers / Entries


From Product Master, you can fetch :

  • Godowns
  • Stock Groups
  • Stock Items
  • Inventory Adjustment Feature is used to update the product's available quantity in stock.


  • BackEnd Exporting Flow:


Godown → Stock → Groups → Stock Items → Ledgers → Vouchers → Inventory Adjustment


  • For viewing the chart of Accounts and Vouchers, please assign ‘show full accounting.'
  • Features group to the User
  • Imported ledgers can be viewed under Invoicing>Chart of accounts in Odoo


  • Imported vouchers can be viewed under Invoicing<Accounting<Vouchers in Odoo.


  • Voucher related journal entries and other journal entries can be viewed under Invoicing<Accounting<Journal Entries in Odoo.


Imported Godowns :

  • Parent Godowns can be viewed under Inventory>Configuration>Warehouses in Odoo.


  • Child Godowns can be viewed under Inventory>Configuration>locations in Odoo.


  • Imported StockGroups can be viewed under Inventory>Configuration>Product Categories in Odoo.


  • Imported StockItems can be viewed under Inventory>Products>Product in Odoo.


  • Inventory Adjustment can be viewed under Inventory>Reporting>Inventory Report in Odoo.


We, at Oodles ERP, provide end-to-end Odoo application development services to build custom enterprise solutions from scratch. Our seasoned developers specialize in using Odoo ERP modules in addition to the latest tech stack and next-gen technologies to build custom ERP applications for varying business needs. Contact us at [email protected] to learn more about our Odoo ERP develoment services. 

Category: ERP Solutions
Banner

Don't just hire talent,
But build your dream team

Our experience in providing the best talents in accordance with diverse industry demands sets us apart from the rest. Hire a dedicated team of experts to build & scale your project, achieve delivery excellence, and maximize your returns. Rest assured, we will help you start and launch your project, your way – with full trust and transparency!